Getting Started
The Jumio Workflow Designer is a no-code, visual tool for building and managing identity verification workflows tailored to your compliance and risk requirements. This section covers how to access, create, publish, and run your first workflow.
Step-by-Step Guide
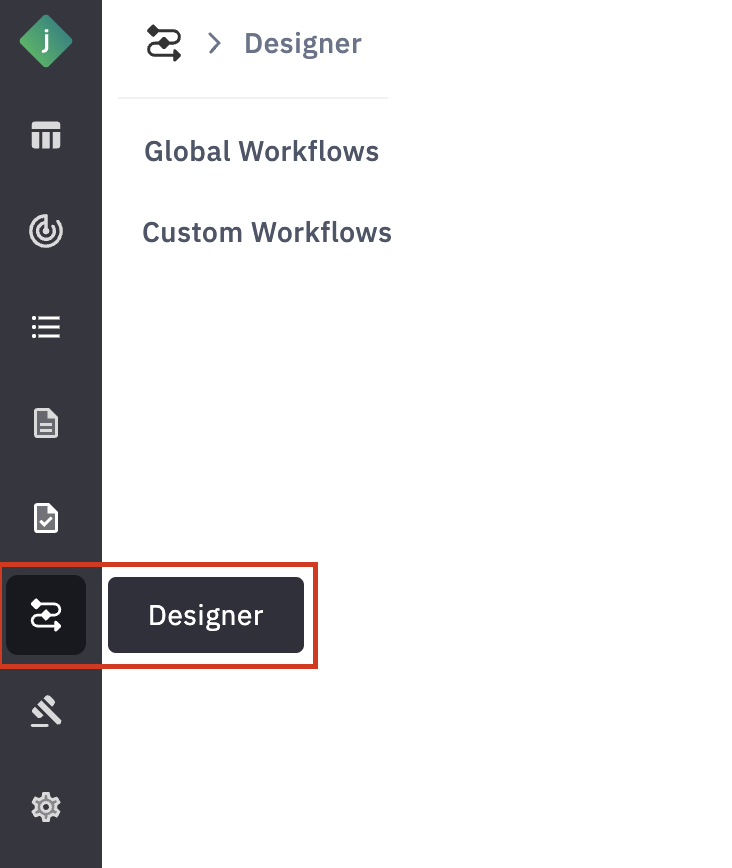
1. Access the Workflow Designer
To access the Workflow Designer,
Step 1: Log in to your Jumio Portal using your organization’s credentials.
Step 2: From the top left navigation bar, select Workflow Designer.
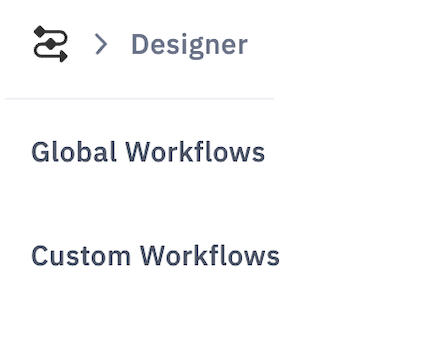
Step 3: Choose between the Global Workflows or Custom Workflows tab depending on your requirements.
Access to the Workflow Designer may be permission-based. If you don't see the option, contact your Jumio administrator or Solutions Engineer.
2. Create a New Workflow
To create a workflow,
Step 1: Select the workflow type
- Global Workflow: Use or customize Jumio’s pre-configured workflows.
- Custom Workflow: Start from scratch to meet specific business needs.
Step 2: Click the Create Workflow button, then select Create New Workflow.
Step 3: Once the workflow is created, provide a name to identify it.
Step 4: Now, your first workflow has been successfully created, and a unique workflow key has been generated.
2.1 Upload a Workflow
The Workflow Designer allows you to upload workflows in JSON format, making it easy to create new workflows from existing configurations. This feature is especially useful for reusing, sharing, or modifying workflow across environments or teams.
When you upload a workflow, the system automatically creates a new workflow and assigns it the next available workflow key in the sequence. The uploaded workflow behaves exactly like any workflow created directly within the Workflow Designer; you can review its configuration, test it, and edit and publish it when ready.
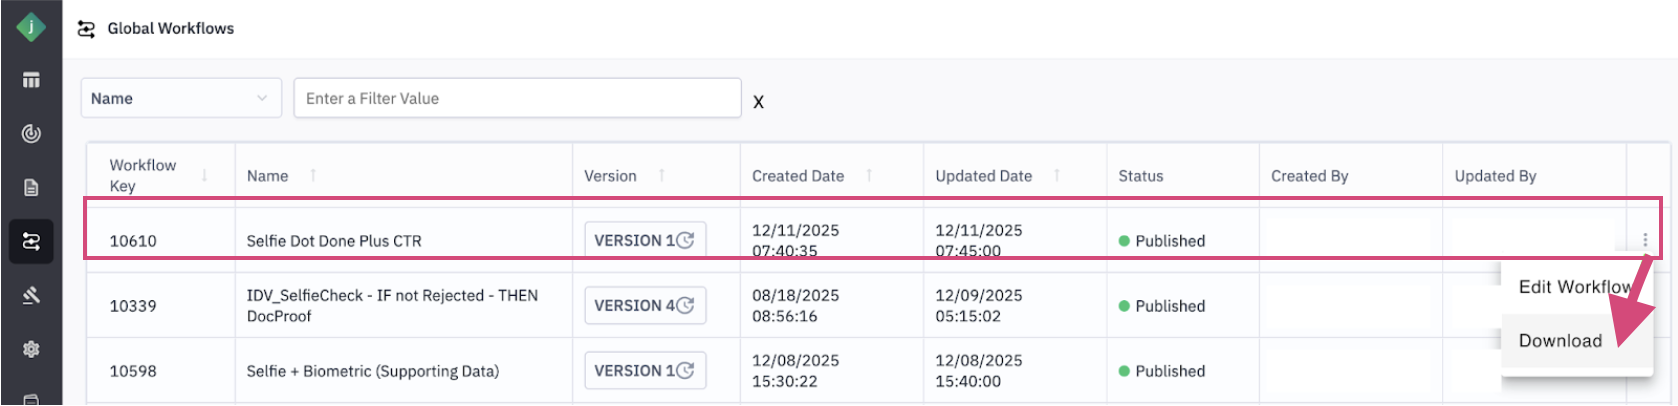
Step 1: Download an Existing Workflow
To begin, download the workflow configuration you want to reuse:
- Open any existing workflow in the Workflow Designer.
- From the right-side menu, click Download.
- The workflow will be downloaded to your device as a JSON file.
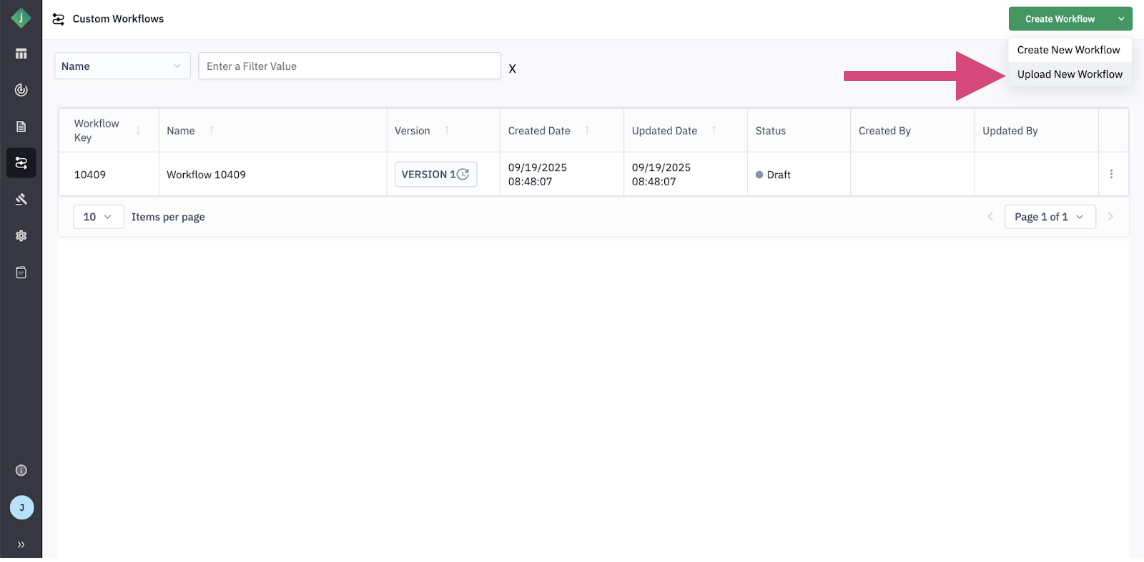
Step 2: Open the Workflow Designer
- Navigate to the Workflow Designer in the Portal.
- Click Create Workflow.
- In addition to creating a workflow from scratch, a new option, Upload Workflow, will be available.
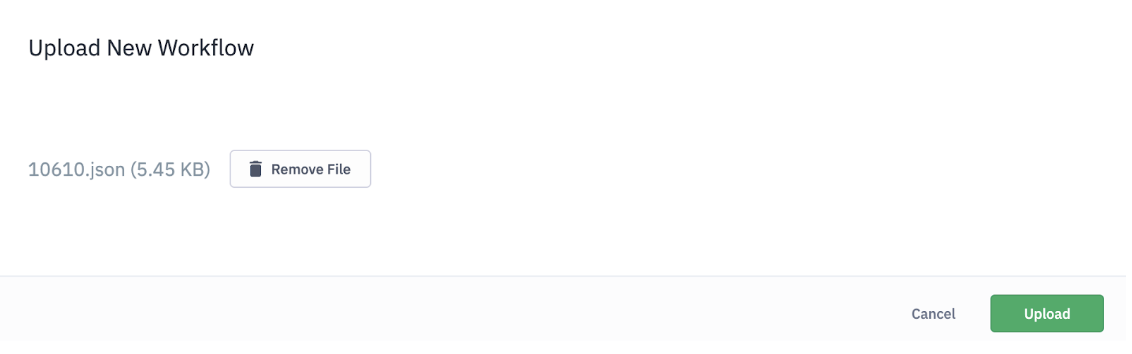
Step 3: Upload the Workflow File
- Select Upload Workflow.
- Drag and drop the downloaded JSON file into the upload window, or use the Browse option to select it from your system.
- Click Upload to proceed.
Step 4: Review and Finalize
- A new workflow will be created using the uploaded configuration.
- Review the workflow settings to ensure they meet your requirements.
- You can edit the workflow, run tests, or publish it as needed.

This process enables faster workflow creation while maintaining full flexibility to customize and validate workflows before they are used in production.
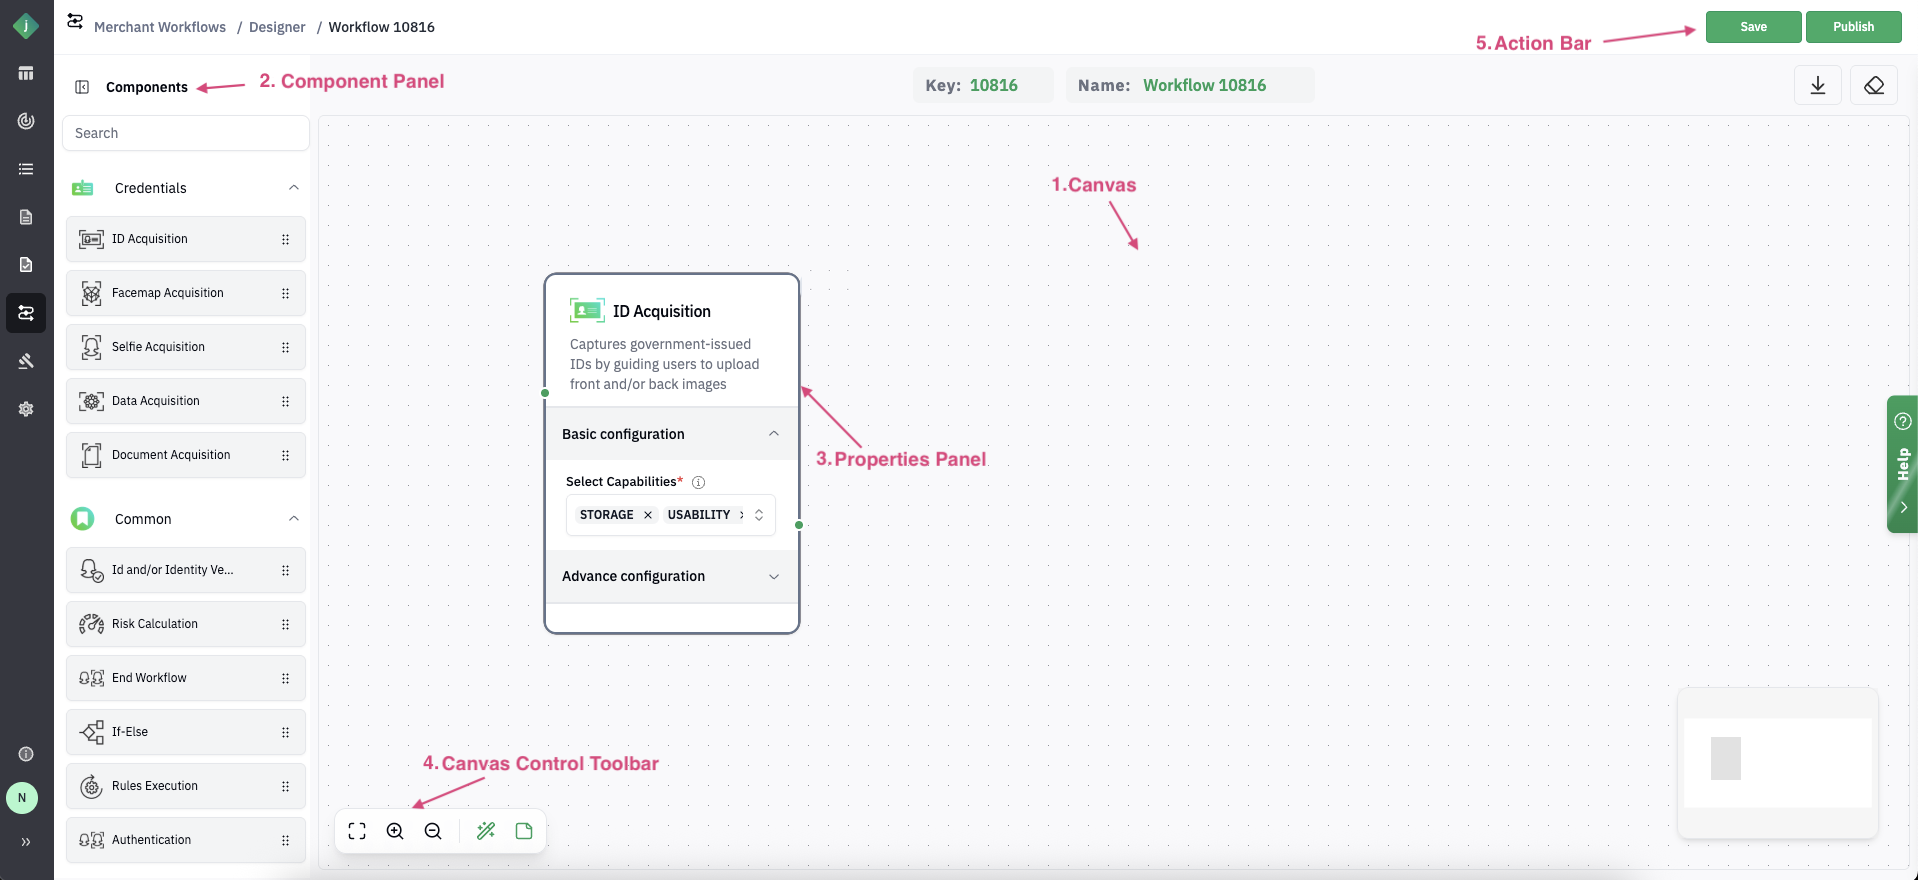
3. Navigate the Interface
The Workflow Designer interface consists of,
1. Canvas: The main area where you drag and drop primitives (building blocks) to build your workflow.
2. Component Panel: A sidebar containing all available primitives such as acquisition steps, verification services, risk checks, decision logic, and endpoints.
3. Properties Panel: Displays for each node, allowing you to review basic or advanced configurations and make edits as needed.
4. Canvas Control Toolbar: Allows you to zoom in/out, center the workflow, lock/unlock the canvas.
5. Action Bar: Located at the top or corner of the interface, the Action Bar contains primary workflow actions such as Save and Publish.
- a. Save: Stores the current draft without making it live.
- b. Publish: Finalizes and activates the workflow for use in production.
4. Understand the Workflow Structure
- Acquisition Primitives: The entry point that defines how a user submits their information (e.g., scans an ID, uses an API).
- Primitives: The individual checks performed within the workflow, such as "verify ID," "capture selfie," or "check device risk."
- Decision Points: Branching logic (If/Else) that changes the workflow's path based on the results of the primitives.
- Risk Calculation Point: A step that aggregates the results from all checks to generate a single, overall risk score for the entire transaction.
- Terminal Node: Indicates the end point of the workflow where the verification process concludes.
4.1. Properties Panel of Workflow Primitives
1. Acquisition Stage
The Acquisition Stage setting defines where a workflow fits within the user's overall verification journey. It supports two modes:
- Initial: Marks the start of a user's identity verification process. Used when collecting identity data for the first time, e.g., during onboarding with ID and selfie capture.
- Intermediate: Used in multi-phase journeys where prior verification has occurred. Ideal for follow-up steps like requesting additional documents (e.g., proof of address).
By configuring this setting, you can design seamless, multi-step verification workflows that align with your customer lifecycle, ensuring flexibility, reducing user friction, and maintaining compliance.
2. Acquisition Type
The Acquisition Type setting defines how user credentials are collected in a workflow either by capturing new inputs or by reusing existing verified data from a prior transaction.
-
Acquire New: Prompts the user to submit fresh credentials (e.g., ID and selfie). Ideal for first-time verifications or onboarding flows.
-
Use Existing: Reuses credentials from a previous successful transaction. Useful for returning users in multi-step journeys. e.g., re-authenticating with a selfie while referencing an already verified ID. For details, check out this section.
-
Reusable Identity: Reuses a pre-verified ID (if the user has already been verified successfully before and is trusted), or Continues with a fresh ID scan (if no pre-verified qualified ID is found or risk is detected). For more details, refer to selfie.DONE.
By choosing the appropriate acquisition type, you can reduce user friction, streamline verification flows, and maintain strong security standards.
3. Select Capabilities
The Select Capabilities setting allows you to define the specific verification checks to be performed on an end user’s identity document (ID) within the ID_IV (Identity Verification) primitive. This ensures each workflow is tailored to your security, compliance, and business requirements.
Expand the list below for available Capabilities
| Capability | Description | Dependencies / Prerequisites |
|---|---|---|
| Usability | Image Quality Assurance – Ensures ID/document images are clear (not blurry, no glare) for accurate processing. Document Identification – Determines document country/type (auto-detected or provided by API/end-user). | None |
| Extraction | Data Capture – Extracts key data using OCR, barcode scan, or MRZ reading. | Requires Usability checks to pass first. |
| Image Checks | Fraud Detection – Forensic analysis to detect digital tampering, physical alteration, or fake/sample IDs. | Requires Usability and Extraction to pass. |
| Data Checks | Data Integrity Verification – Validates MRZ checksum, expiration dates, and consistency of extracted data. | Requires Usability, Extraction, and Image Checks to pass. |
| Liveness | Presence Verification – Confirms a real person is present using selfie analysis to block spoofing attempts (screens, prints, masks). | Selfie must first pass Usability. |
| Similarity | Face Matching – Compares the ID face with selfie to confirm identity of the user. | Both ID and selfie images must pass Usability. |
| Authentication | Returning User Verification – Matches a new selfie/facemap against a previously stored facemap. | Requires an existing facemap and selfie passing Liveness. |
4. Channels
The Channels setting in Jumio Workflow Designer determines how end users submit their credentials and interact with the verification flow. This configuration ensures the workflow aligns with your platform, whether it's web, mobile app, or backend-driven integration. Jumio supports three primary channels,
| Type | What it is | When to use |
|---|---|---|
| API | Direct backend integration using REST APIs to submit images and data captured via your own interface. | Ideal for fully custom workflows where you manage the UI, capture, and consent. Best suited for advanced, backend-controlled use cases. |
| Web | A hosted, ready-to-use Web Client that guides users through the verification process with camera access and real-time feedback. | Best for fast, low-effort web integration. Jumio manages the UI, captures experience, and updates, so no maintenance is required. |
| SDK | Native SDKs for iOS and Android, along with a customizable Web SDK. These offer features like autocapture, liveness detection, and full branding support. | Web SDK is recommended for web apps that require self-hosted, customized UI journeys. |
5. Parts
The Parts setting defines which sides of an ID document users must capture.
- Front Only: Use for single-sided documents like passports or national IDs. Simplifies the capture process.
- Front and Back: Required for two-sided IDs like driver’s licenses. Ensures complete data extraction and fraud checks.
6. Parts (Data Acquisition)
- Device Risk: Collects device signals like IP, OS, and location to assess fraud risk. Useful for onboarding and transaction protection.
- Prepared Data: Accepts user data (e.g., email, phone) via API for verification without document capture. Ideal for standalone checks.
7. Label
Use Labels to identify multiple credentials in the same workflow uniquely. This is essential when collecting more than one document from a user (e.g., both passport and national ID). Labels help clearly distinguish each credential in API responses and verification results. In single-ID workflows, labels are optional.
5. Credential References
The documents, scanned images, or data that are evaluated by a Jumio workflow are called Credentials. Each Jumio capability specifies the Credential(s) it can evaluate. The required credentials for each capability that is invoked by a workflow must be uploaded to the end-user accountClosed prior to initiating the workflow.
Supported credential types include,
- ID
- Selfie
- Facemap
- Document
- Data
For detailed information about each credential type, refer to this page.
6. Save and Publish the Workflow
- Save the workflow at any stage without impacting live transactions. While in this state, the workflow status remains Draft.
- When you're ready to make the workflow active, publish it. Upon publishing, the workflow status updates to Published, making it available for use in transactions.
- Jumio supports version control, allowing you to track changes or duplicate versions.
7. Launch the Workflow
After publishing your workflow follow the steps below,
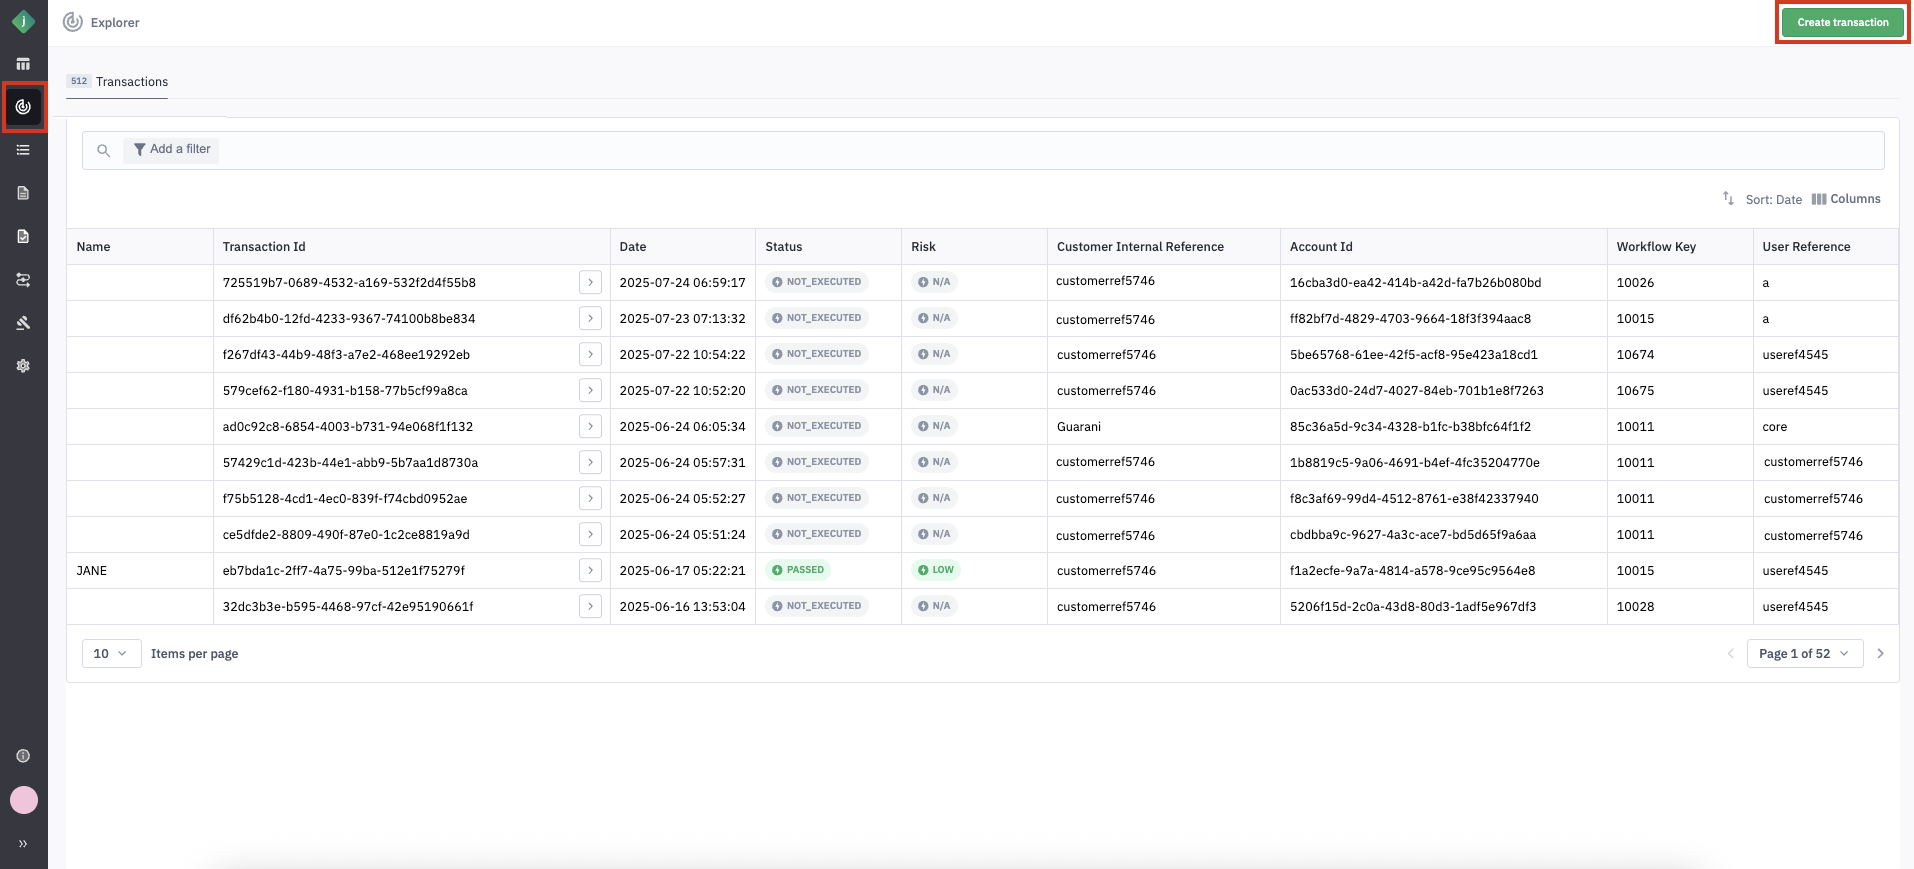
7.1. Navigate to the Transactions Page
Step 1: Go to the Transactions tab in the Explorer section of the Jumio Portal.
Step 2: Click on Create Transaction.
7.2. Select the Workflow
Step 1: You can specify the workflow in one of the following ways:
- From the Workflow List: Select a workflow from the available list.
note
If you select the "Document Verification" workflow, you'll also need to fill in the Document Type and Document Country fields under Advanced Settings.
- By Workflow Key: Enter the unique Workflow Key associated with a previously published workflow.
7.3. Enter Required Details
Step 1: Fill in the following mandatory fields such as Locale, User Reference, Customer Reference.
Step 2: For details on these fields, refer to the General Parameters section.
Step 3: You can also fill in additional optional fields as needed.
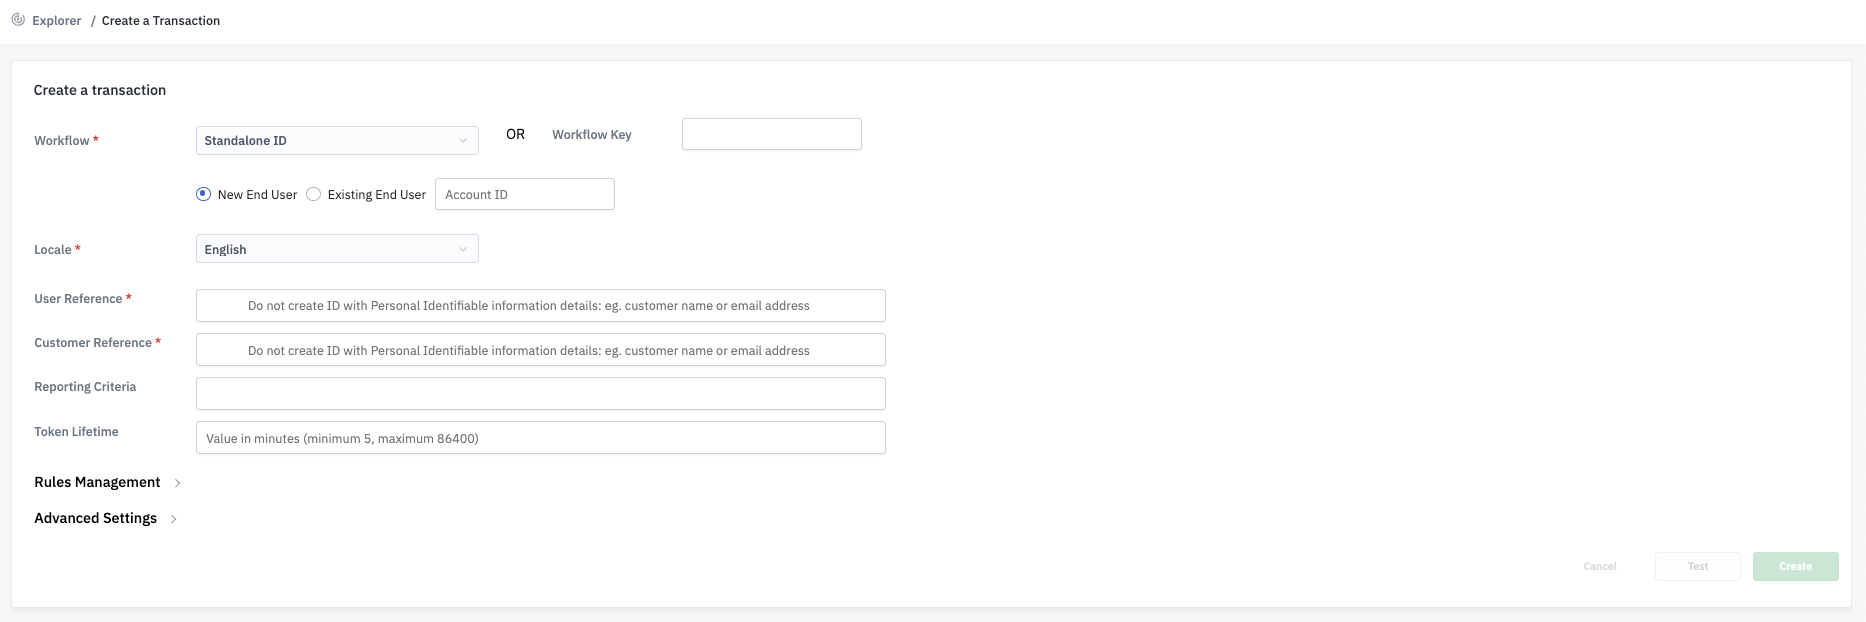
7.4. Add Ruleset Configuration(Optional)
If applicable, you can define which Rulesets should be used for this transaction:
Step 1: Expand the Rules Management section.
Step 2: Enter the appropriate Ruleset IDs to control how scores and decision labels are assigned.
7.5. Configure Advanced Settings(Optional)
Step 1: Expand the Advanced Settings section to specify additional parameters such as document handling, expiration settings, or compliance options.
Step 2: See Advanced Settings for field descriptions.
7.6. Create the Transaction
Step 1: Click Create to initiate the Transaction.
7.7. Enter the Data(Conditional)
-
If the selected workflow allows support data submission, the Customer Input (Data) section will appear.
-
You can provide data in two ways,
- Individual Fields Tab: Manually enter data into the available fields and click Submit.
- Entire JSON Tab: Paste your full input as a JSON object and click Submit.
-
For field definitions, refer to Customer Input (Data).
7.8. Test the Workflow (Optional)
Step 1: Click the Test button to simulate the customer journey directly in your browser. This allows you to experience the steps an end user would go through during verification.
The Test feature is only available if you selected a workflow from the list. It does not work when entering a workflow key manually.
7.9. View Transaction Details
After the transaction is created,
Step 1: A unique Transaction ID is displayed.
Step 2: If the workflow is configured to generate a customer-facing URL, it will be displayed and automatically copied to your clipboard.
8.Workflow Listing
The Workflow Listing screen provides a centralized view of all workflows created in your Jumio account, whether Global or Custom. From this screen, you can search, filter, and manage workflows efficiently, including accessing specific versions, reviewing statuses, and initiating edits.
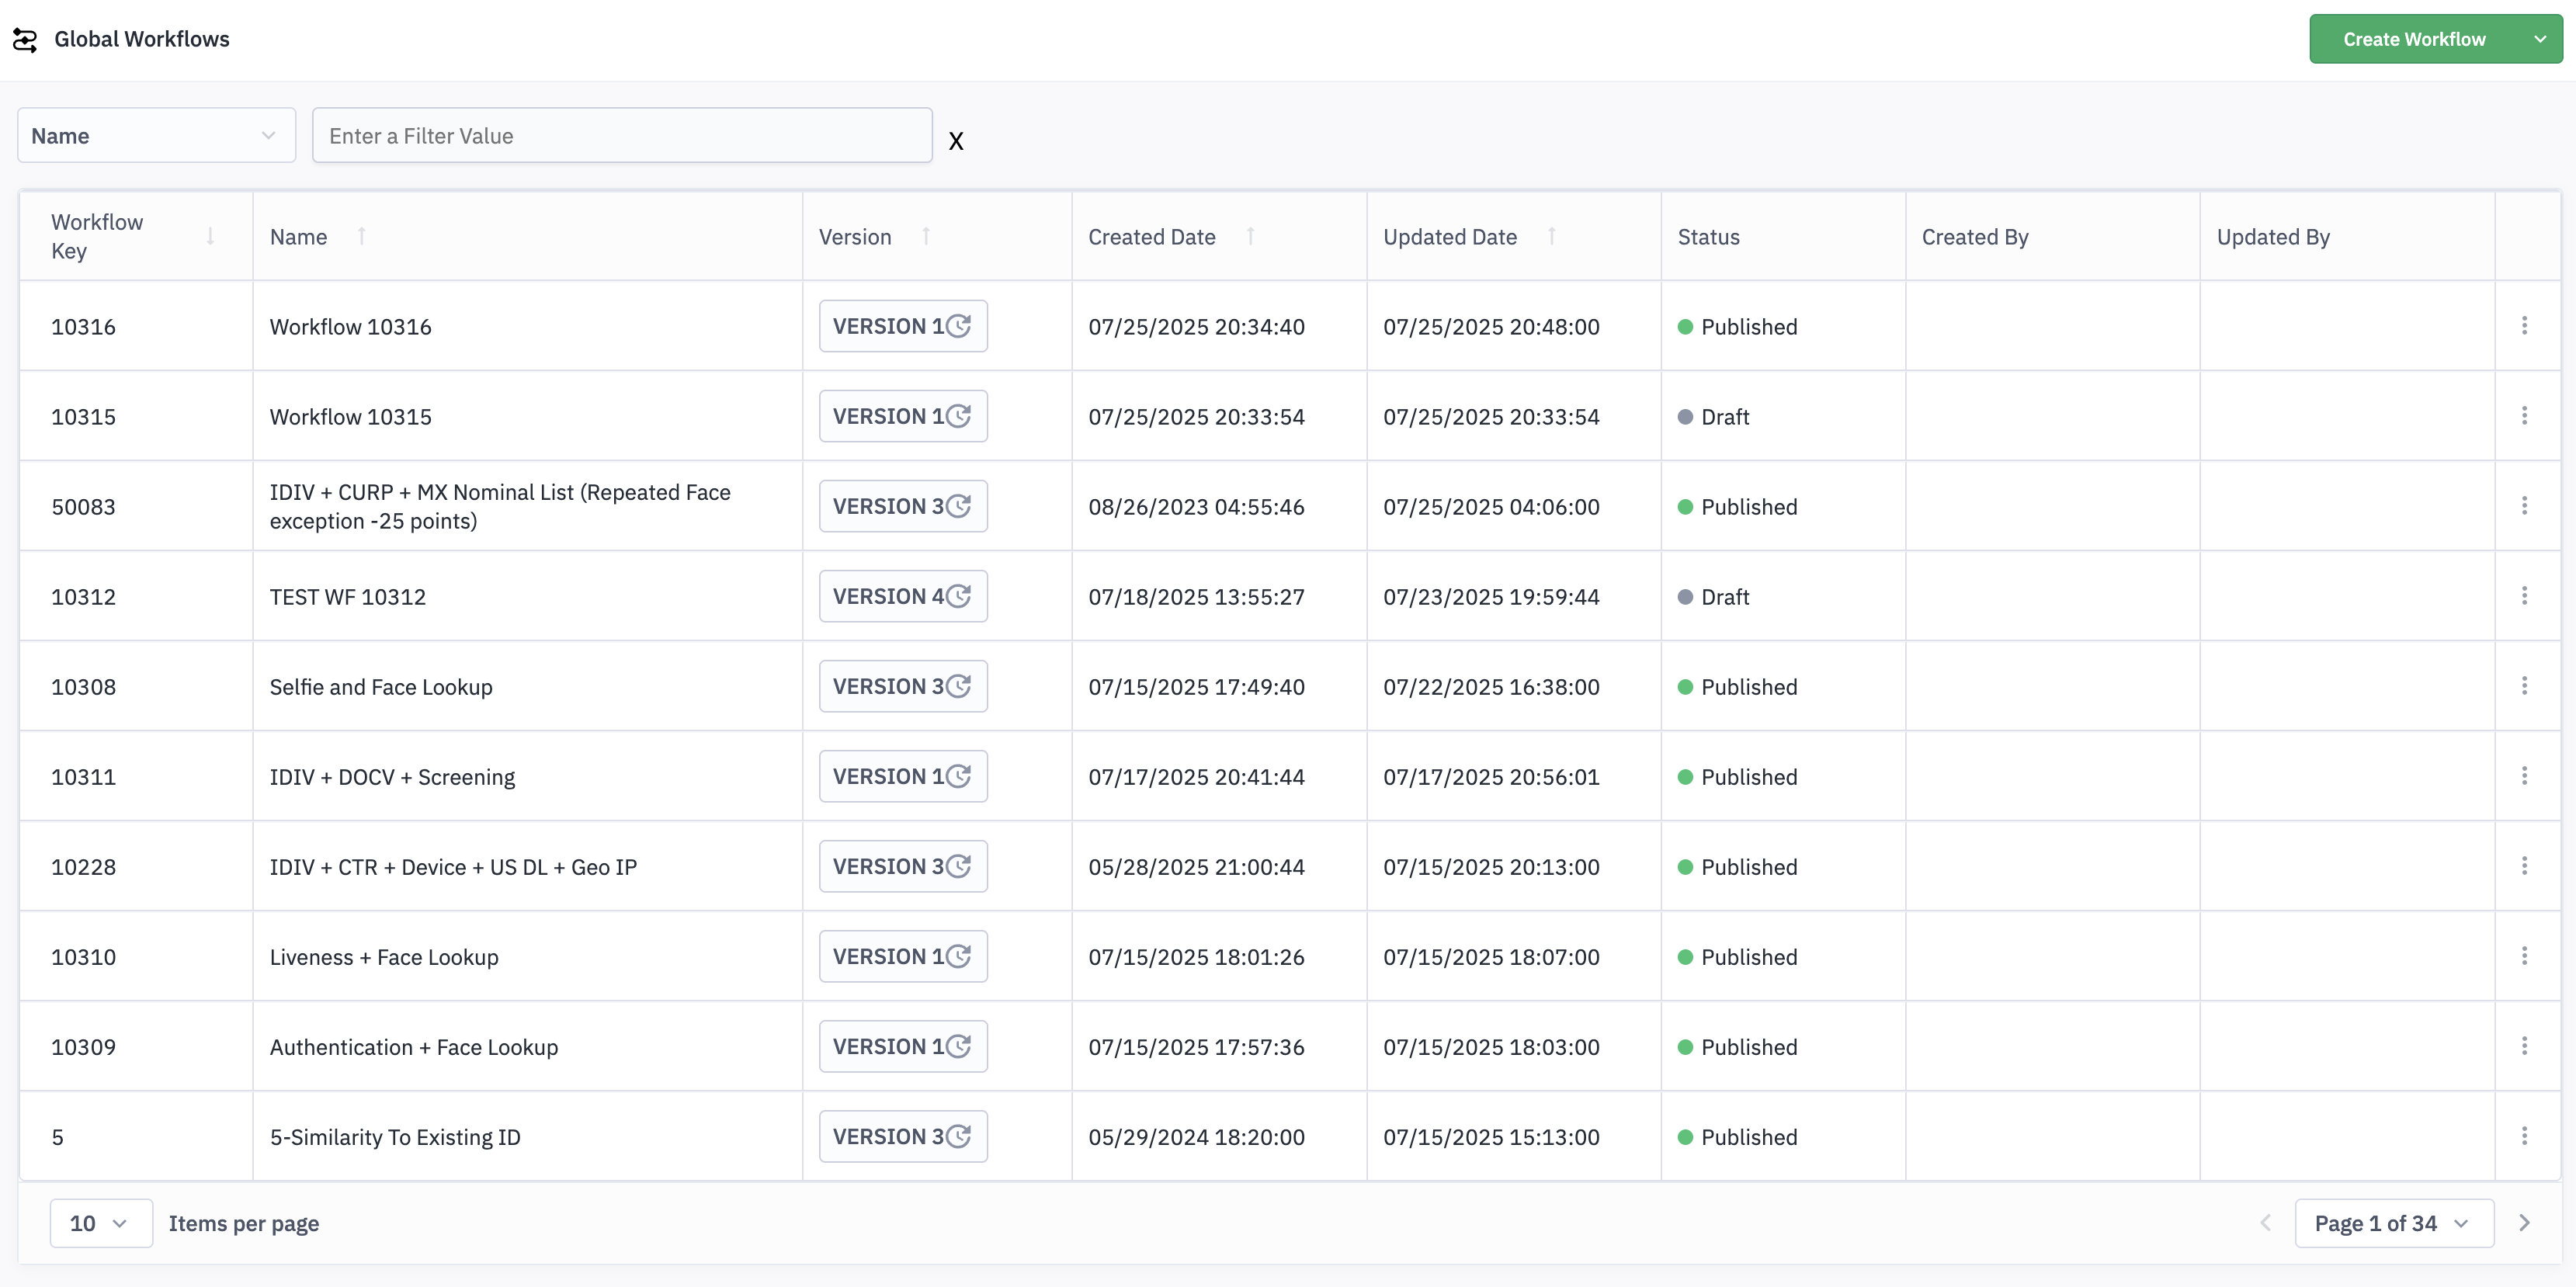
| Column | Description |
|---|---|
| Workflow Key | A unique identifier automatically assigned to each workflow as per the use case. |
| Name | The custom or default name assigned to the workflow, used for easy identification and organization. |
| Version | Displays the current version number of the workflow (e.g., Version 1.0, Version 2.0). The latest version is shown by default in the listing. You can view and access previous versions by clicking the version label in the same row. |
| Created Date | Date and time when the workflow was initially created. |
| Updated Date | Date and time of the most recent update made to the workflow. |
| Status | Displays whether the workflow is in Draft (editable) or Published (active). |
| Created By | Email address of the user who originally created the workflow. |
| Updated By | Email address of the user who last modified the workflow. |
| Action | Accessible via the three-dot icon in each workflow row, provides options to manage individual workflows. The available actions include:
|
9.Capabilities References
Jumio transactions execute workflows that pass a set of credentials associated with an end-user account to a sequence of capabilities. Each capability evaluates one or more types of credentials and renders a decision about each credential or credential part that it evaluates, along with supporting details about the decision.
For each capability there is information about,
- Dependencies on other capabilities.
- Prerequisites for using the capability (if any)
- Supported credential types.
- The textual labels that may be returned to support the decision.
- Other data that is returned (if any)
For additional information refer to detailed, Capabilities.