selfie.DONE
selfie.DONE is an innovative and user-friendly verification method that significantly reduces friction in the ID verification process for trusted users. Instead of scanning an ID every time, Jumio can reuse a previously verified ID when no risk is detected.
The user experience flow starts with a Liveness check. Based on the result, Jumio either:
- Reuses a reusable ID (if the user has already been verified successfully before and is trusted), or
- Continues with the standard ID verification flow (if no reusable qualified ID is found or risk is detected).
This provides a faster and smoother user experience while maintaining strong fraud protection.
- selfie.DONE requires Jumio Premium Liveness to reuse a previously verified ID. Premium Liveness ensures strong liveness verification before ID reuse. If it is not enabled, the verification flow automatically continues with the standard ID verification after Liveness.
- selfie.DONE supports Central and South American countries. For users located outside these regions, reusable ID searches are not available, and the user must complete a standard ID scan. If you are looking selfie.DONE support for other regions where you operate please contact Jumio Support or Jumio Sales.
Key Benefits
1. Faster verification For trusted users who have previously completed ID verification, there is no need to scan the same ID again. selfie.DONE reuses a trusted ID, so verification takes less time and feels smoother.
2. More completed sign-ups With fewer steps, more people finish the process. This results in higher conversion rates and lower drop-off rates.
3. Keep and win more customers A simple journey helps you keep existing customers and attract new ones who value speed and ease.
4. Strong security Even when using a stored ID, every check runs against Jumio’s latest fraud models and identity network. You get less friction without compromising on fraud risk protection.
Supported Channel and Market
- Channel: Web SDK and Mobile SDK (API channel not currently supported).
Prerequisites
selfie.DONE supports past ID reuse based on the data provided for each transaction. To use the latest release of selfie.DONE, customers must meet the following requirements:
- Be natively integrated on the Jumio platform.
- Use the Web or Mobile SDK channels for verification.
- Have Liveness Premium and ID Verification enabled as part of the verification journey.
- Allow Biometrics (Face) Lookup and ID Data Lookup on the tenant account.
Reusable ID usage is allowed only for customers utilizing the Direct Consent model, where Jumio operates as the Independent Controller.
Supported Search Criteria
The ability to trigger a reusable ID search depends on different combinations of user data supplied within Prepared Data. If the required data is not provided or Jumio does not find a matching user, the transaction automatically proceeds with a new ID scan. Currently, there are two supported user data options available for selfie.DONE:
- Name and Date of Birth (Recommended – Global)
- Country-Specific Identification Number
1. Name and Date of Birth (Recommended – Global)
Use the individual’s full name along with their date of birth. This search criterion is supported globally and is the recommended default for searches across all countries within your tenant account’s Accepted IDs configuration.
| Search Criteria | Applicable Countries | Required Fields in Prepared Data |
|---|---|---|
| Name + Date of Birth | IDs from all supported countries | firstName, middleName (if present on Govtg-issued ID), lastName, dateOfBirth |
Provide First Name, Middle Name (if present in Govt. issued ID), Last Name, and Date of Birth to enable reusable ID search across all supported countries. This is the recommended user data to be supplied for a selfie.DONE.
Unless explicitly required by a country:
- Provide only First Name, Middle Name (if present in Govt. issued ID), Last Name, and Date of Birth.
- Do not include Middle Name, unless it appears explicitly on the official document (e.g., Philippines)
2. Country-specific Identification Number
selfie.DONE supports identifier-based reusable ID search for specific countries using country-specific unique identifiers.
Identifier searches always use an exact match strategy.
| Search Criteria | Applicable Countries | Required Prepared Data Fields |
|---|---|---|
| CPF + Document Country | Brazil | personalNumber (CPF), addressCountry |
| CURP + Document Country | Mexico | personalNumber (CURP), addressCountry |
| DNI + Document Country | Peru | personalNumber (DNI), addressCountry |
- Country-specific identification numbers (such as CPF or CURP, etc.) approach should be used when the collection and use of such identifiers is prevalent as part of the onboarding process in a country, and users are okay to provide them. Examples: CPF number in Brazil or CURP in Mexico, etc.
- Identifier-based searches are performed only if the Identification Number country is provided as part of the address country field within the Prepared data.
- If the country is not provided as part of the addressCountry, the identifier search will not return a match, and the transaction will proceed with a standard ID verification flow.
- Except for Brazil, identifier-based searches (personalNumber + addressCountry) generally have a lower likelihood of returning a reusable ID compared to First Name + Middle Name (if present in Govt. issued ID) + Last Name + Date of Birth–based searches.
- In the current version, reusable ID search is limited to transactions originating in Central and South America. Users located in other regions must scan a new ID. If you are looking selfie.DONE support for other regions where you operate please contact Jumio Support or Jumio Sales.
3. Limiting the ID returned by selfie.DONE
Default limitation on reusable IDs returned
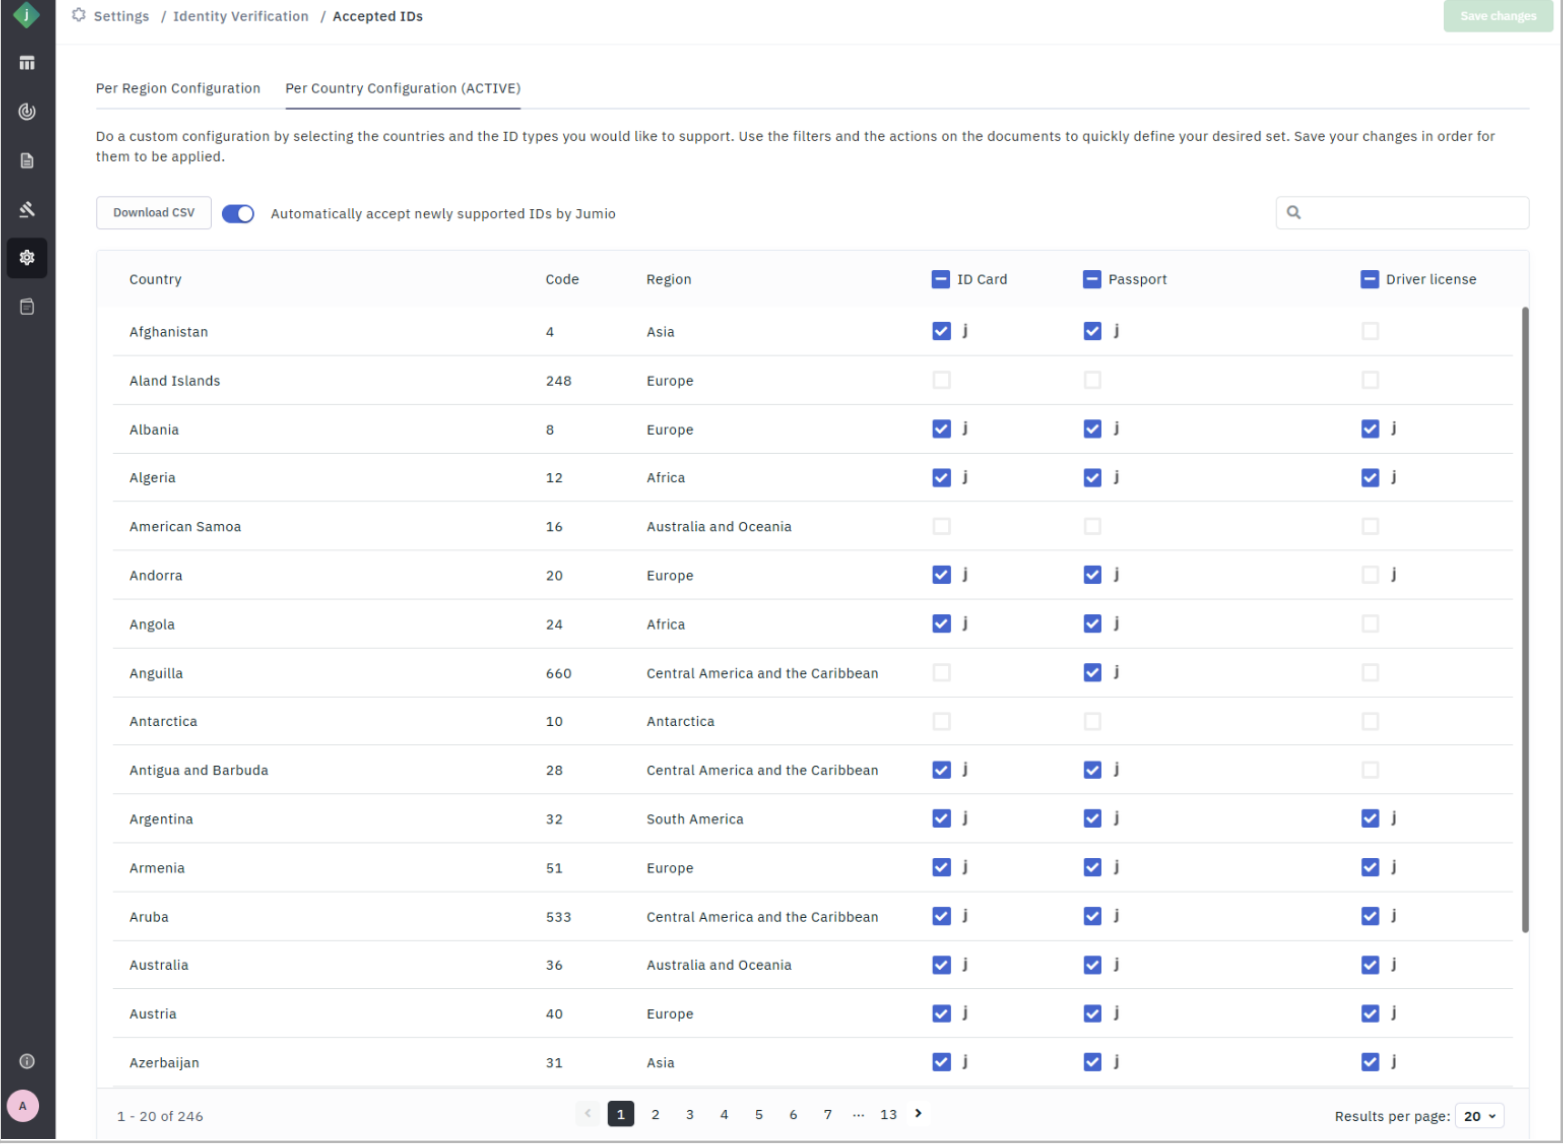
To maintain consistency with normal ID Verification and customers’ compliance requirements, Jumio always limits the search to the “Accepted IDs” configuration of the tenant account where the transaction is processed.
You can find them listed for your tenant account on Jumio Portal → Settings → Identity Verification → Accepted IDs.
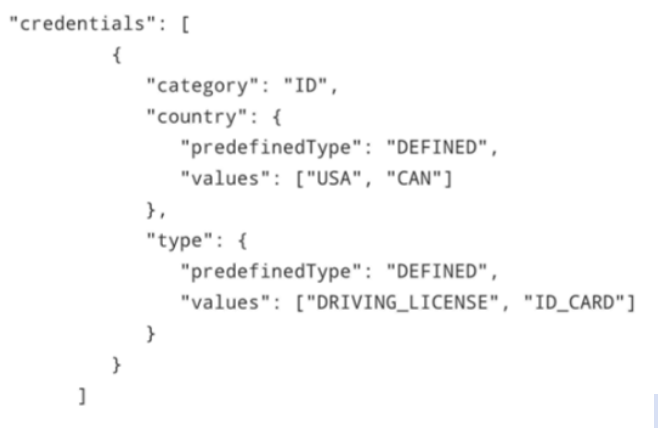
Limiting reusable IDs returned per transaction
Further, to limit the number of returned reusable IDs per transaction, you can use Country and/or Document Type in the ID Credential section of the Account API. This will limit the returned reusable ID to the provided Country and/or Document Type, if found with Jumio.
Example
How Does This Work?
Step 1: Data Preparation
Before initiating the verification process, the Customer collects the required information from the user and includes it in the initial Account Initiation call as part of the Prepared Data.
Recommended (Global)
Provide First Name, Middle Name (if present in Govt. issued ID), Last Name, and Date of Birth to enable a global reusable ID search across all supported countries within your tenant account’s Accepted IDs configuration.
Example
- First Name: Jane
- Middle Name: Mary
- Last Name: Doe
- Date of Birth: 1992-08-14
Country-specific Identification Number (Alternate approach):
For certain countries, a government-issued identification number may be provided along with the address country. For more details, check this section.
Example: Brazil-issued Documents
- Address Country: BRA
- CPF field provided in the personalNumber field of prepared data (no special characters)
Limiting the search per transaction - Check this section to limit the reusable ID returned to specific countries and/or ID types.
Step 2: Liveness Check
The user performs a liveness check to confirm physical presence,
- Instructions are provided to guide the user through the proper face capture process.
- Consent is obtained as required for the transaction.
- Liveness checks detect and flag malicious attempts using photos, videos, or deepfakes.
Hence, when the liveness result is Passed, the face is captured successfully, and the system proceeds to search for an ID using the search criteria. When the qualified IDs are found, Jumio confirms by performing biometric matching against past qualified reusable IDs found. This ensures the highest level of security and accurate data sharing on behalf of the ID owner.
If any risk is flagged during the liveness check, or if no eligible reusable ID is found, the workflow bypasses ID reuse and proceeds with a standard ID verification flow.
Step 3: User Confirmation
If one or more eligible reusable IDs are found, Jumio applies additional security and integrity checks and presents single ID for reuse, which has the highest confidence with respect to that transaction.
A. The system displays the type of ID identified for reuse.
- ID Image is not shared with the user
B. The user can choose to: - Use this ID to complete the transaction, or
- Initiate a new ID scan and upload a new ID if needed.
User confirmation is required to reuse the previously verified ID. If no eligible reusable ID is found, or if any risk is detected by Jumio, the user is seamlessly routed to a standard ID verification flow for extraction and verification. Decision making occurs in the background, and the user remains unaware.
Step 4: Completing Transaction
1. Using Reusable ID
a. The transaction completes faster since ID verification was already performed. b. All background processing, including extraction and fraud risk checks, is executed to ensure security.
- This enables the use of the latest fraud detection models and Jumio’s network knowledge about risky connections.
- Your current integration with Jumio doesn’t change, and ID Verification output format and data are received as usual. c. Any other custom risk checks — such as Brazil CPF check, Cross Transaction Risk, Device Risk Check, etc are executed as usual if configured as part of the workflow and enabled for the Customer account.
Step 5: Viewing Reusable ID Usage in Transaction Results
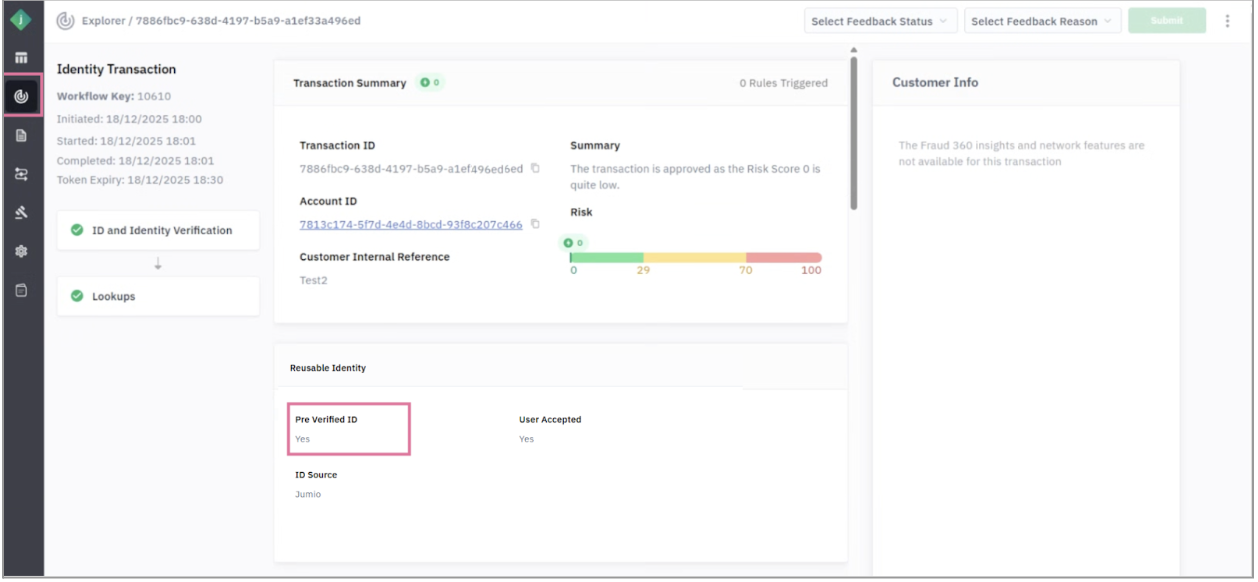
When a transaction is processed through selfie.DONE, i.e., uses a Reusable ID for processing; this is reflected in the transaction results.
On the Jumio Portal, the transaction details page displays a “Reusable Identity” section indicating:
- PreVerified ID: Whether a reusable ID was used for the transaction.
- User Accepted: Whether the user accepted the reuse of the previously verified ID during the flow.
- ID Source: Source of reusable ID. Default is Jumio, except Brazil where it can also be Local Datasource.
If no eligible reusable ID is found, this section will not appear, and the transaction will reflect standard ID verification information.
Tracking Reusable ID Usage
Reusable ID use can be tracked using the Jumio Retrieval API. Refer to the Retrieval API documentation here.
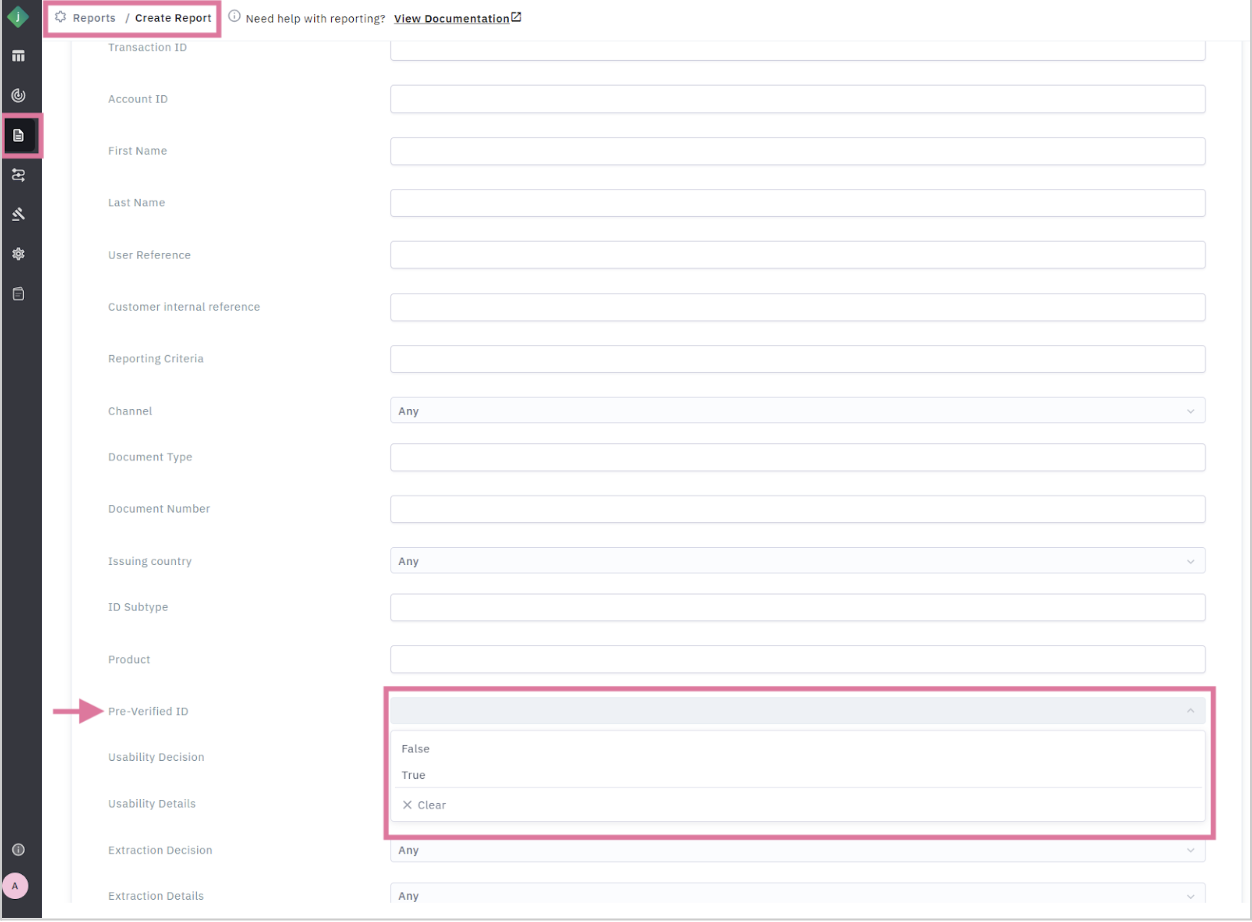
Customers can also identify transactions where a reusable ID was used using Jumio Portal in the following ways:
- Explorer page - Filter transactions using the Pre-Verified ID = True/False filter.
![]()
- Reporting - The Pre-Verified ID field is available as an extractable field in reports.
Build a Workflow with selfie.DONE
You can configure and manage the selfie.DONE verification flow directly in the Jumio Workflow Editor. This self-service setup lets you define when to reuse a previously verified ID or trigger a new ID verification.
Steps to Configure
Step 1: Open the Workflow Editor in the Jumio Portal.
Step 2: Create a new workflow or select an existing one to update.
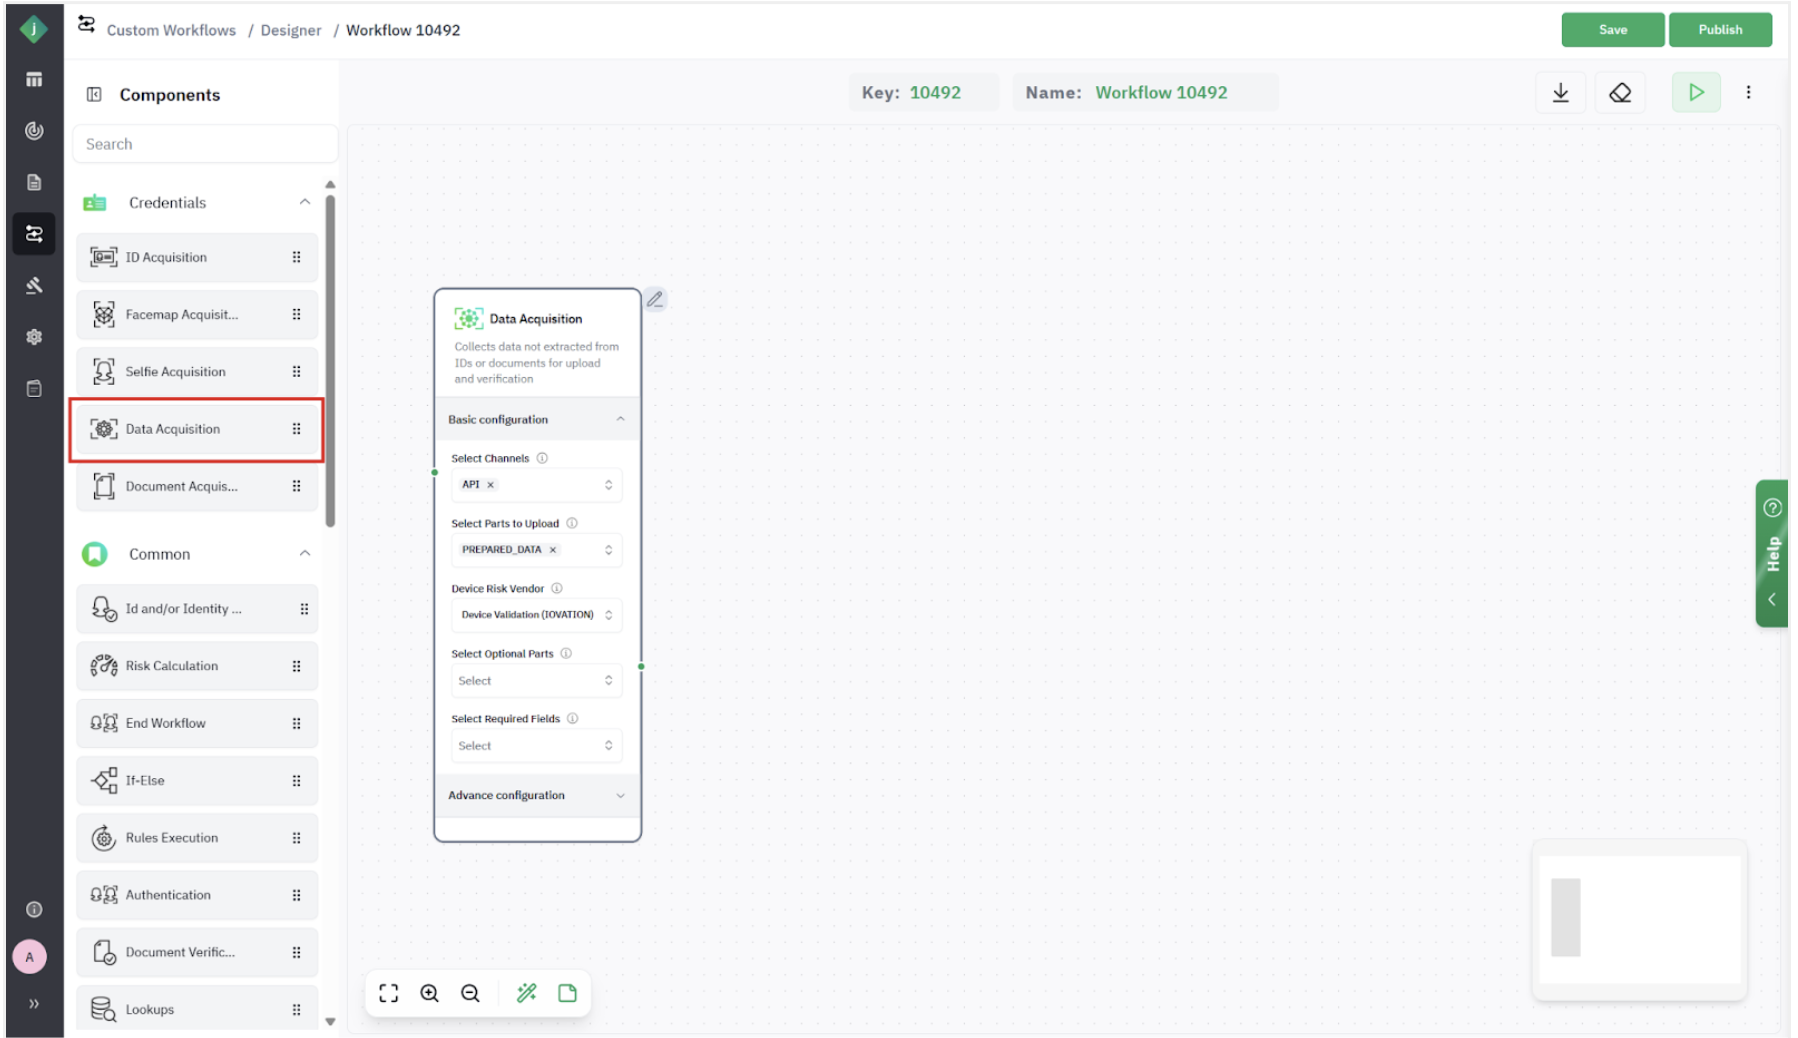
Step 3: In the Workflow Builder, add the following components:
Step 3.1: Configure Data Acquisition
- Navigate to Credentials Options and add Data Acquisition as the first step in the workflow.
Step 3.2: Configure Selfie / Facemap Acquisition
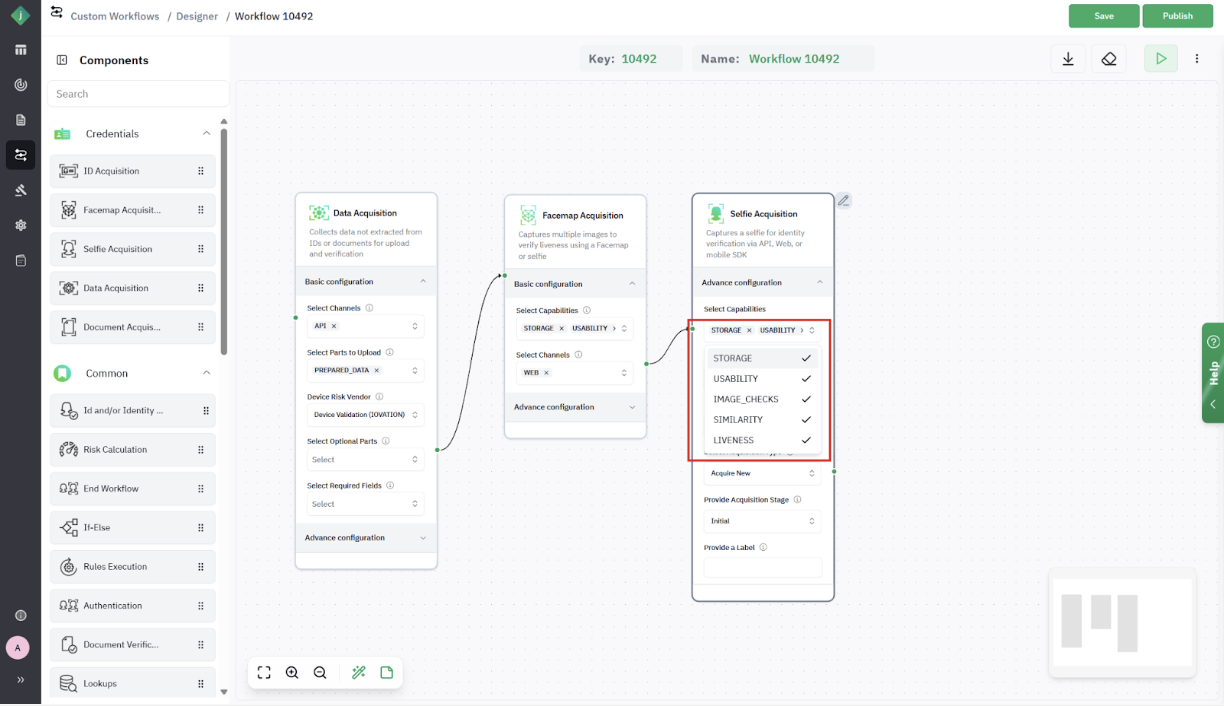
For Facemap Acquisition, follow the steps below,
-
From Credentials Options, add a Facemap Acquisition step.
-
Ensure that the Web and/or Mobile SDK is selected as a supported channel.
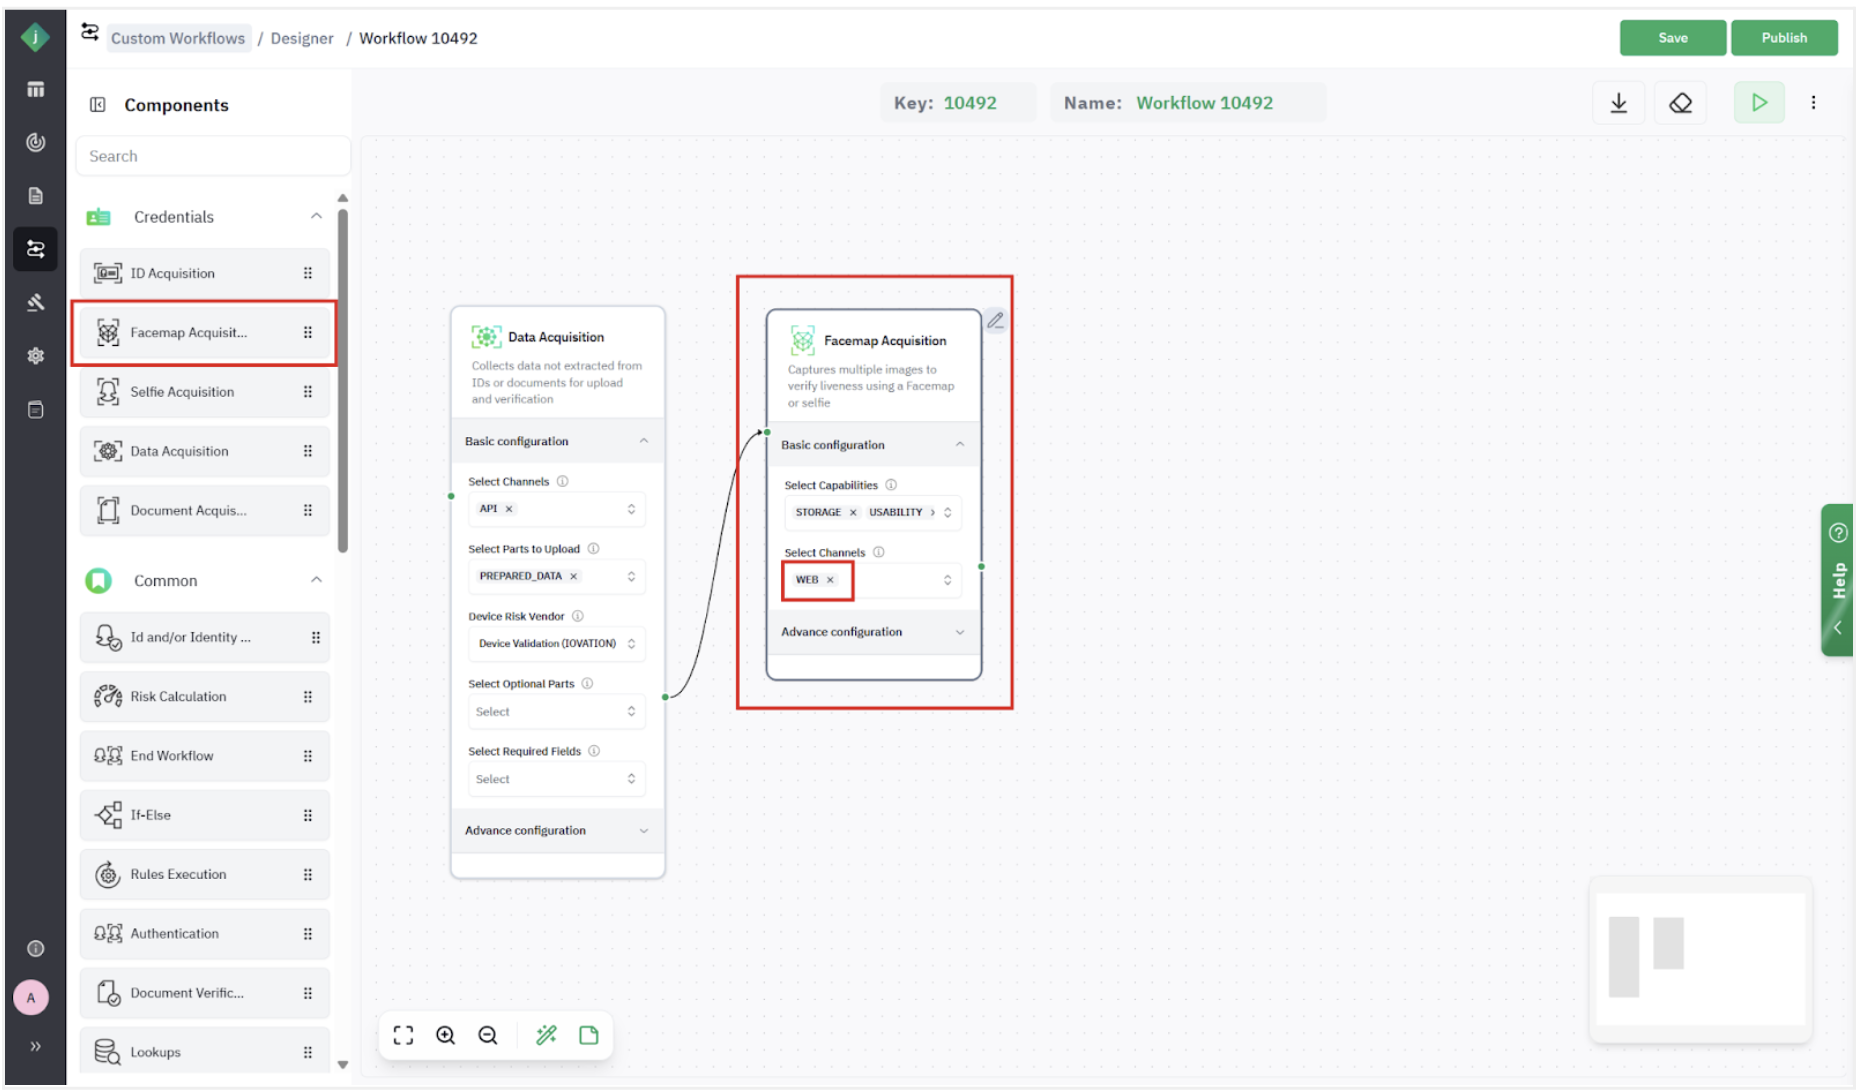
-
Ensure that Storage, Usability, and Liveness are selected as Capabilities.
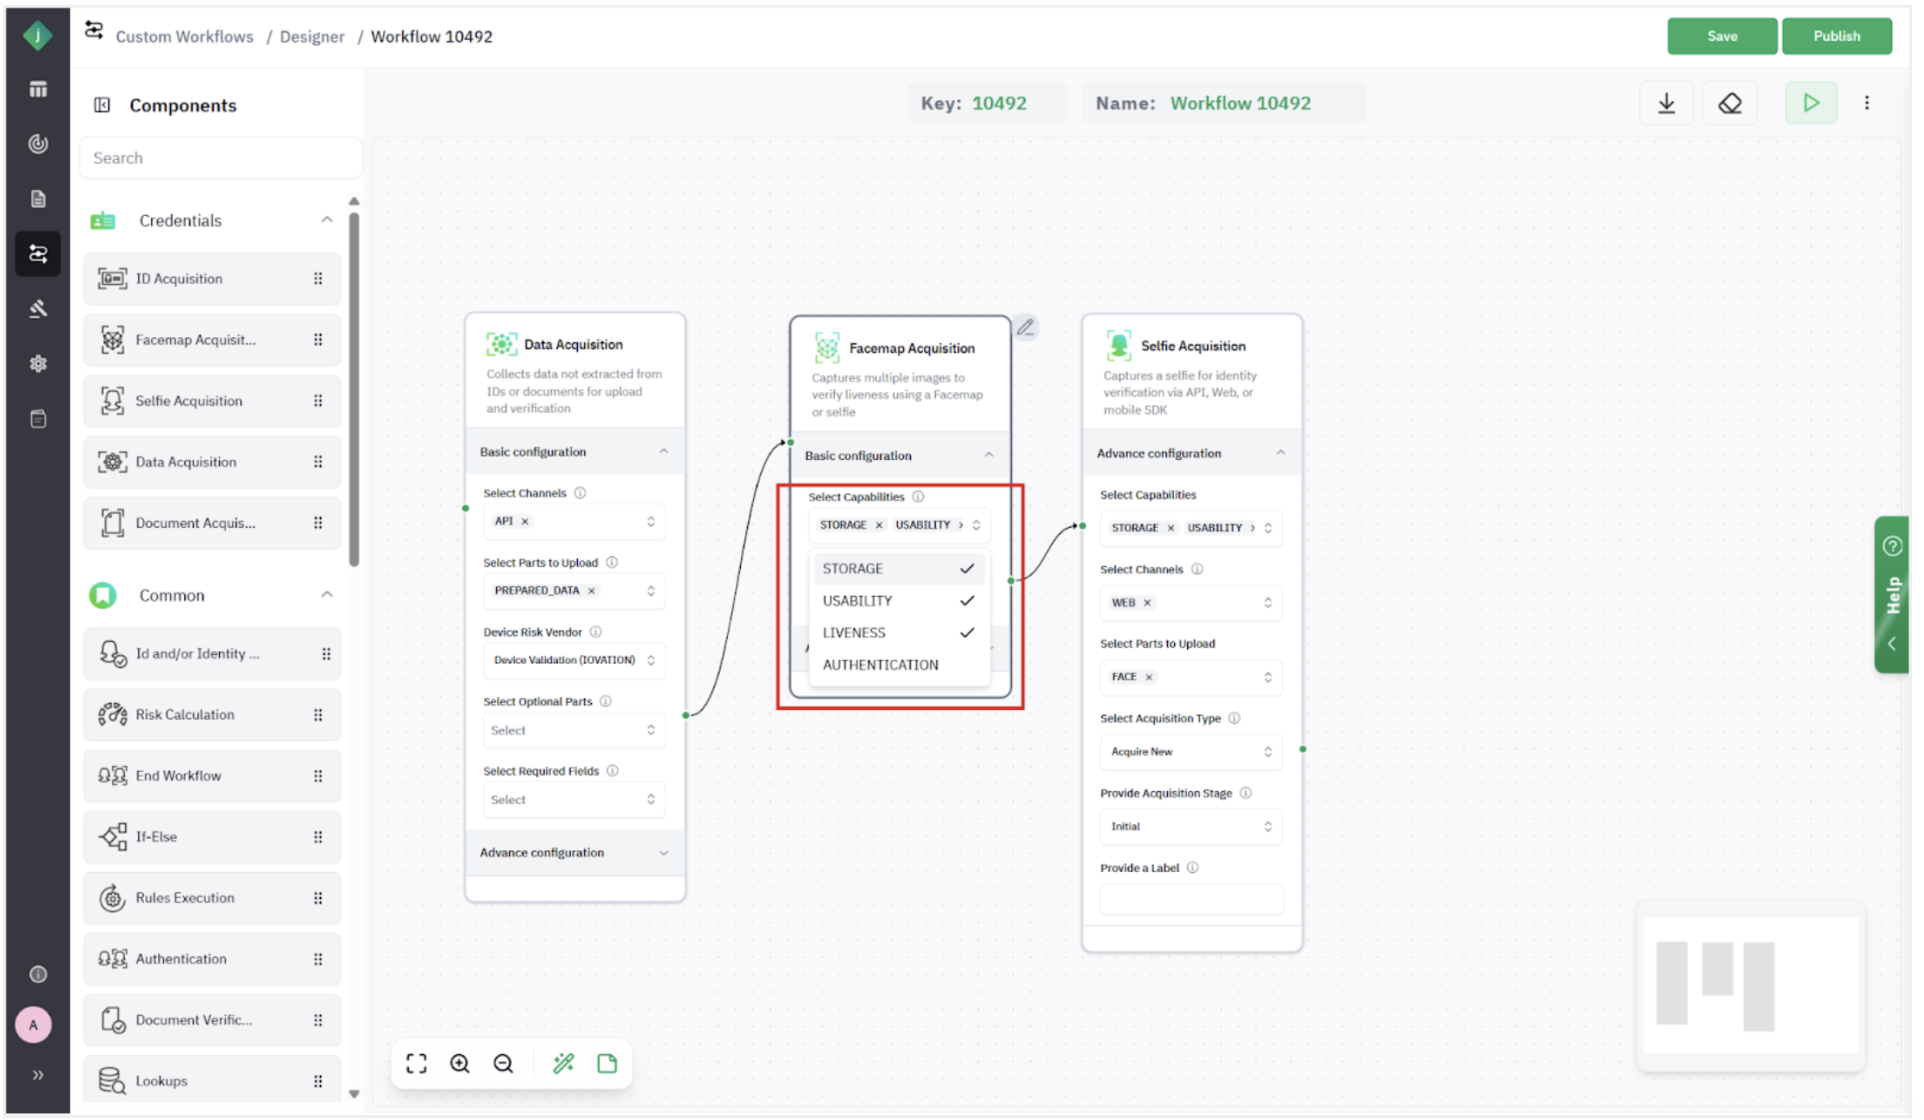
For Selfie Acquisition, follow the steps below,
- From Credentials Options, add a Selfie Acquisition step.
- Select the Web and/or Mobile SDK as the supported channel.
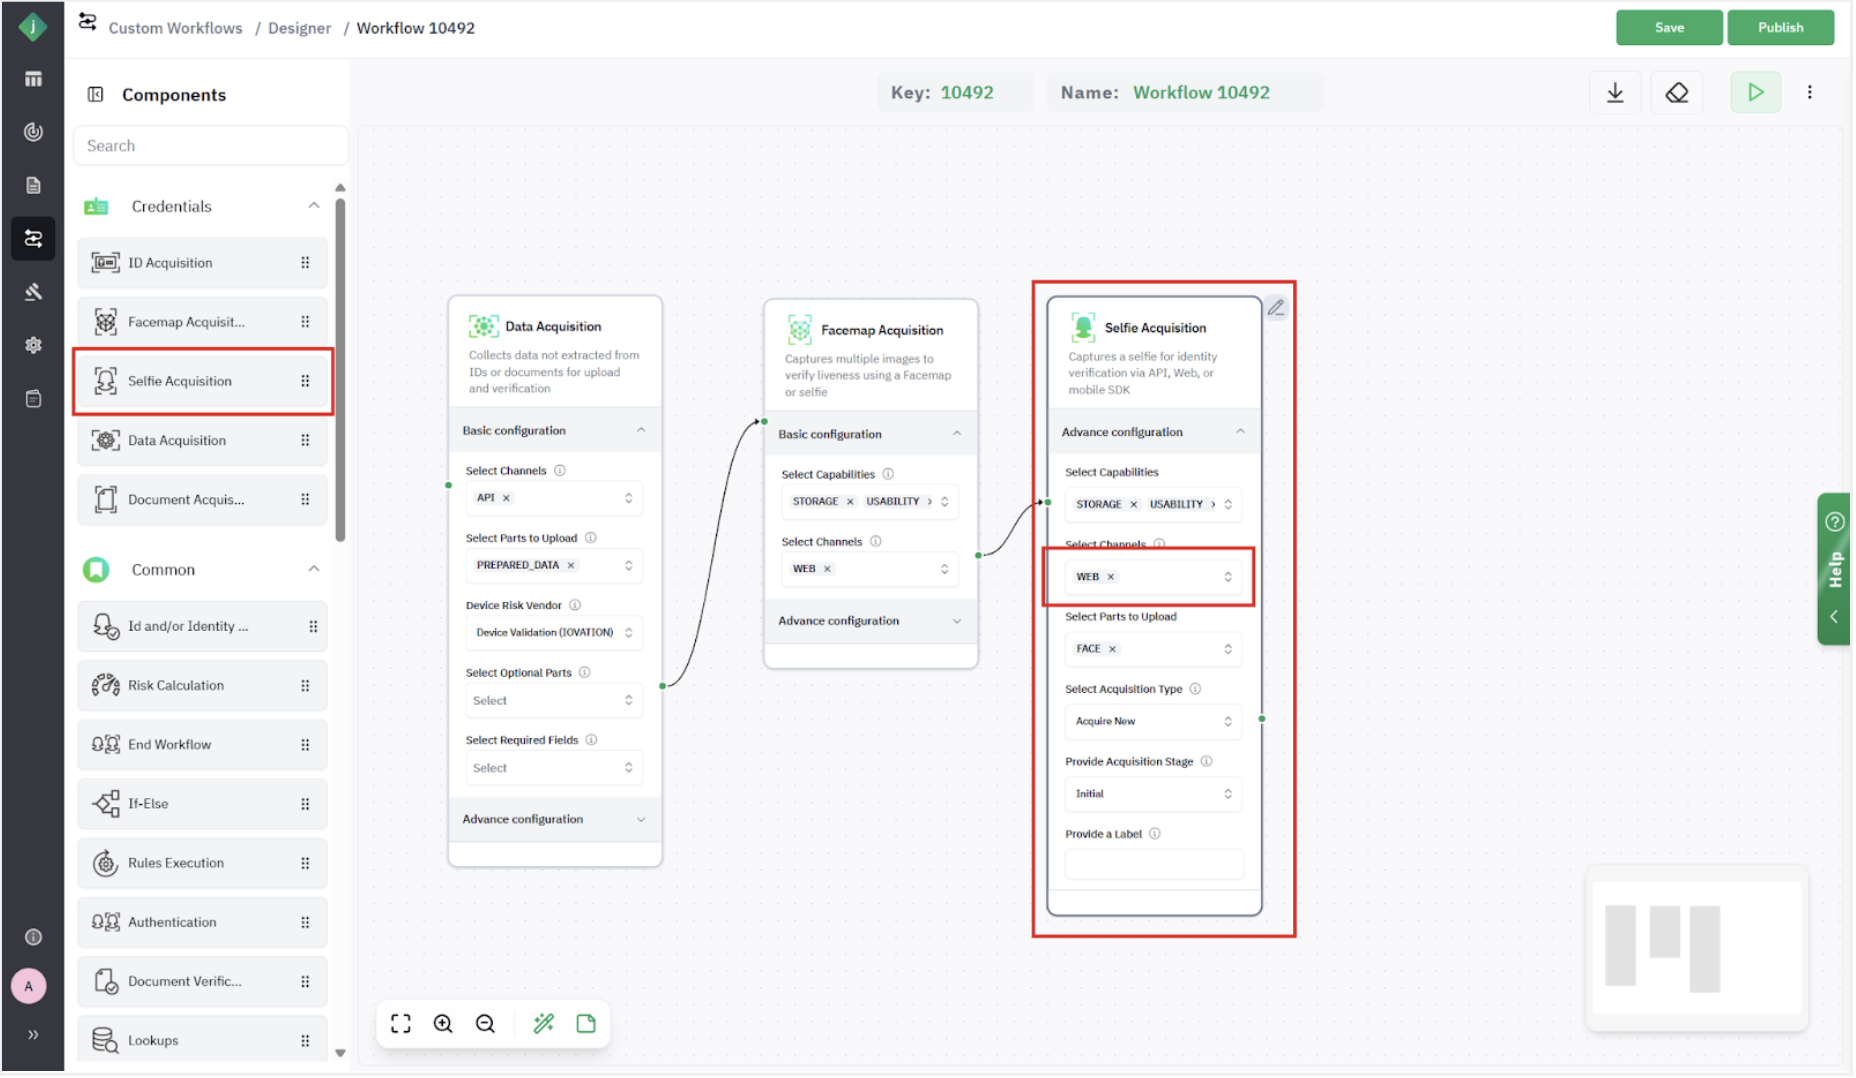
- Enable the following capabilities: Storage, Usability, Liveness, Similarity, and Image Checks.
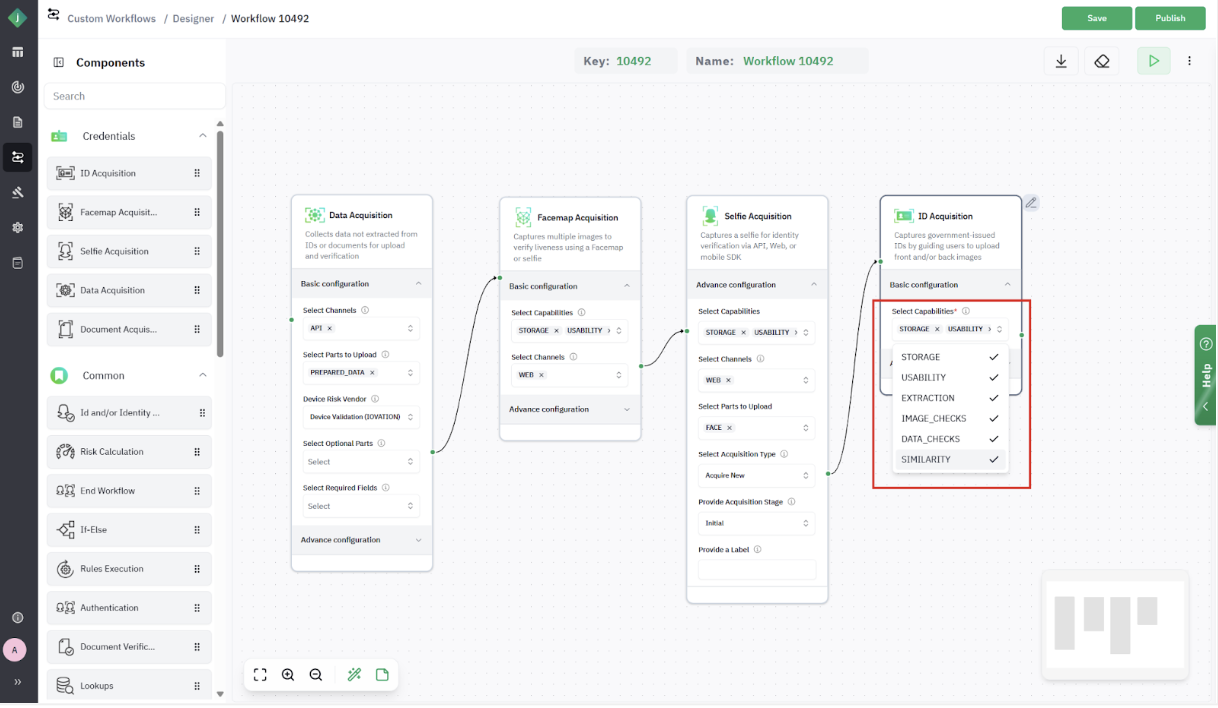
Step 3.3: Add ID Acquisition
- From Credentials Options, add an ID Acquisition step.
- Under Advanced Configuration, select the Web and/or Mobile SDK as the supported channel.
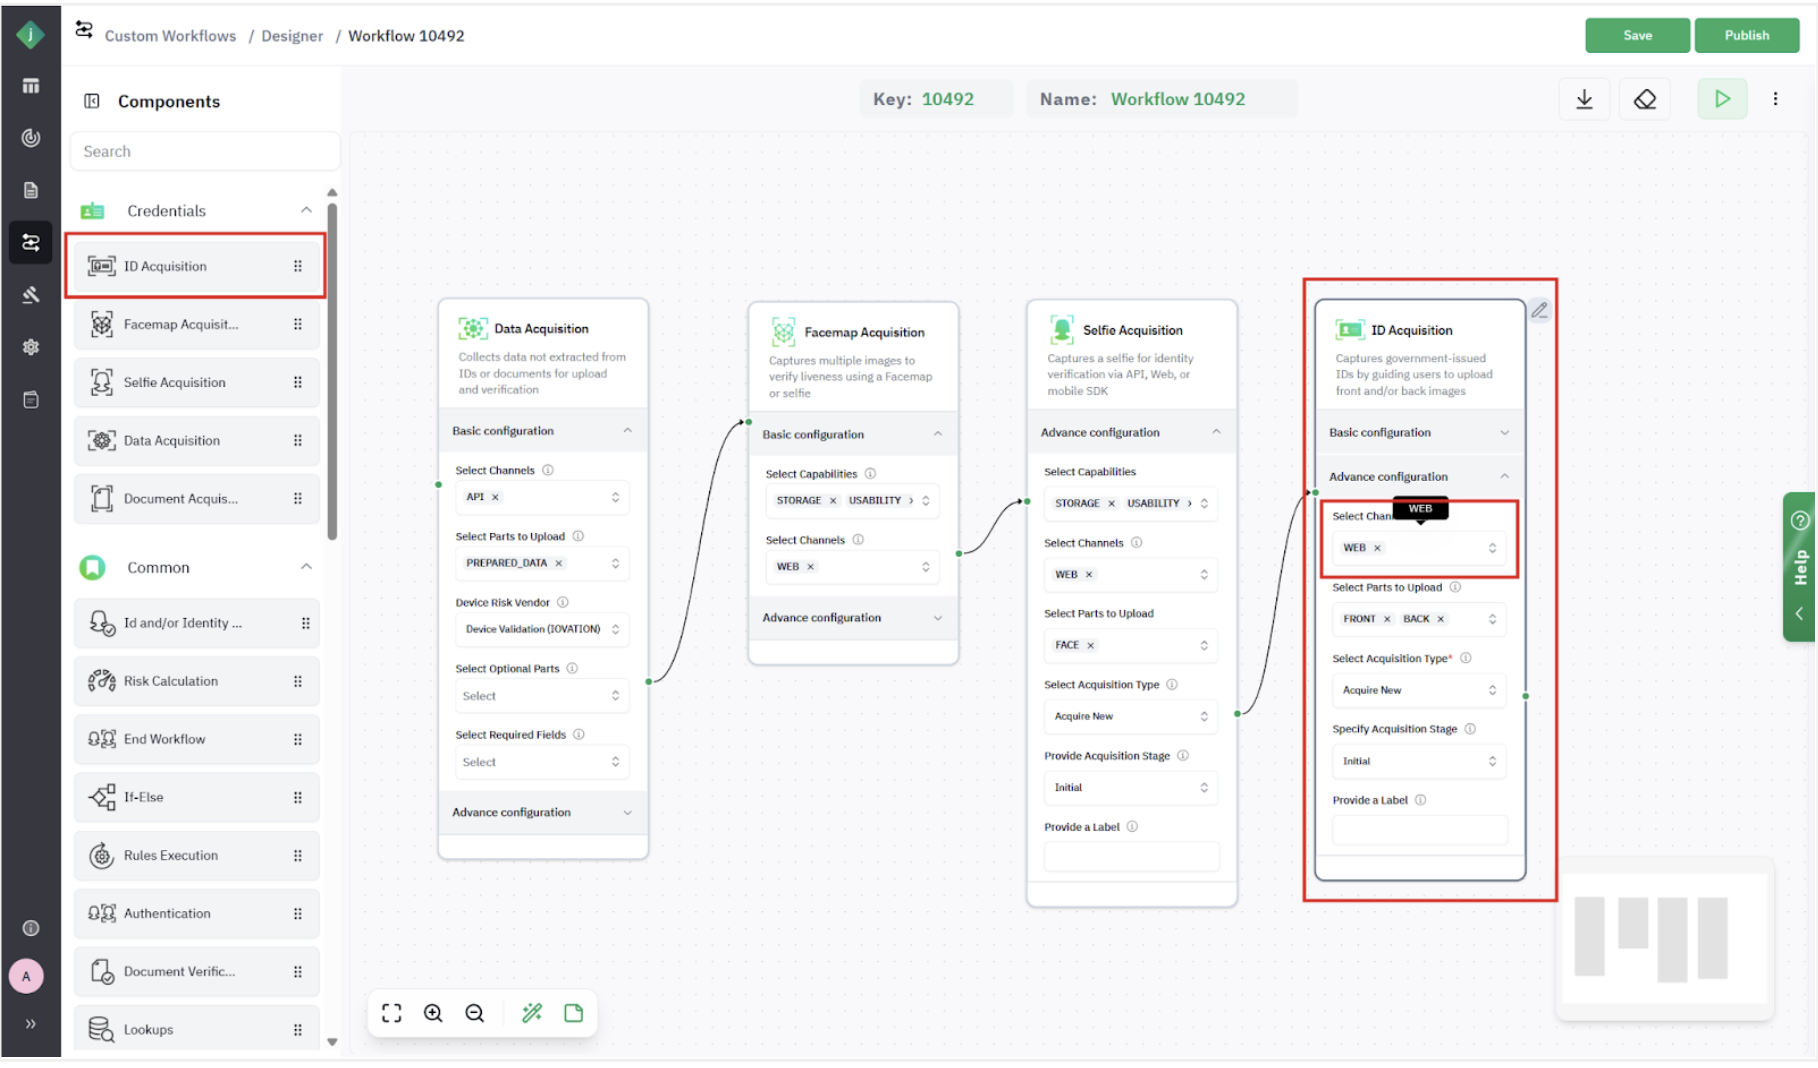
- Select Reusable ID as the Acquisition Type.
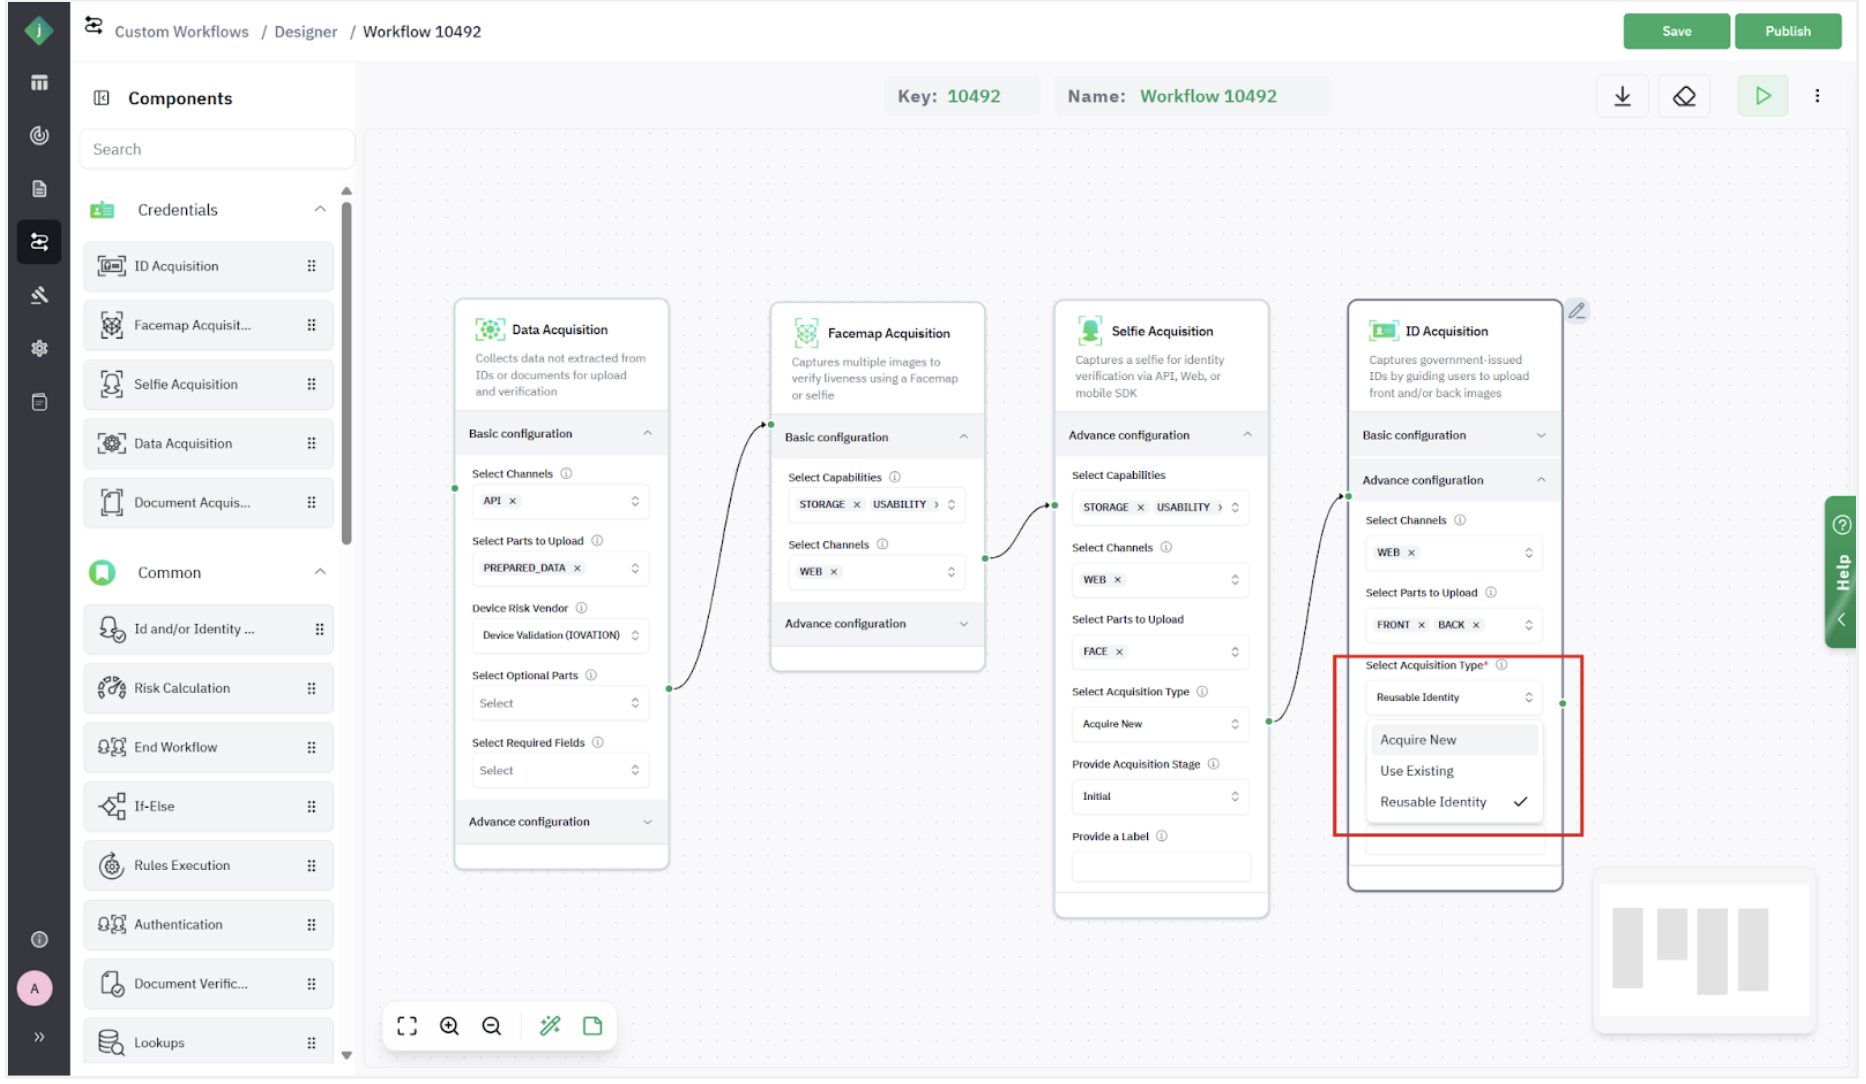
- Under Basic Configuration, enable the following capabilities: Storage, Usability, Extraction, Image Checks, Data Checks, and Similarity.
Step 3.4: Add ID / Identity Verification and Risk Evaluation
- From the Common section, add an ID or Identity Verification step.
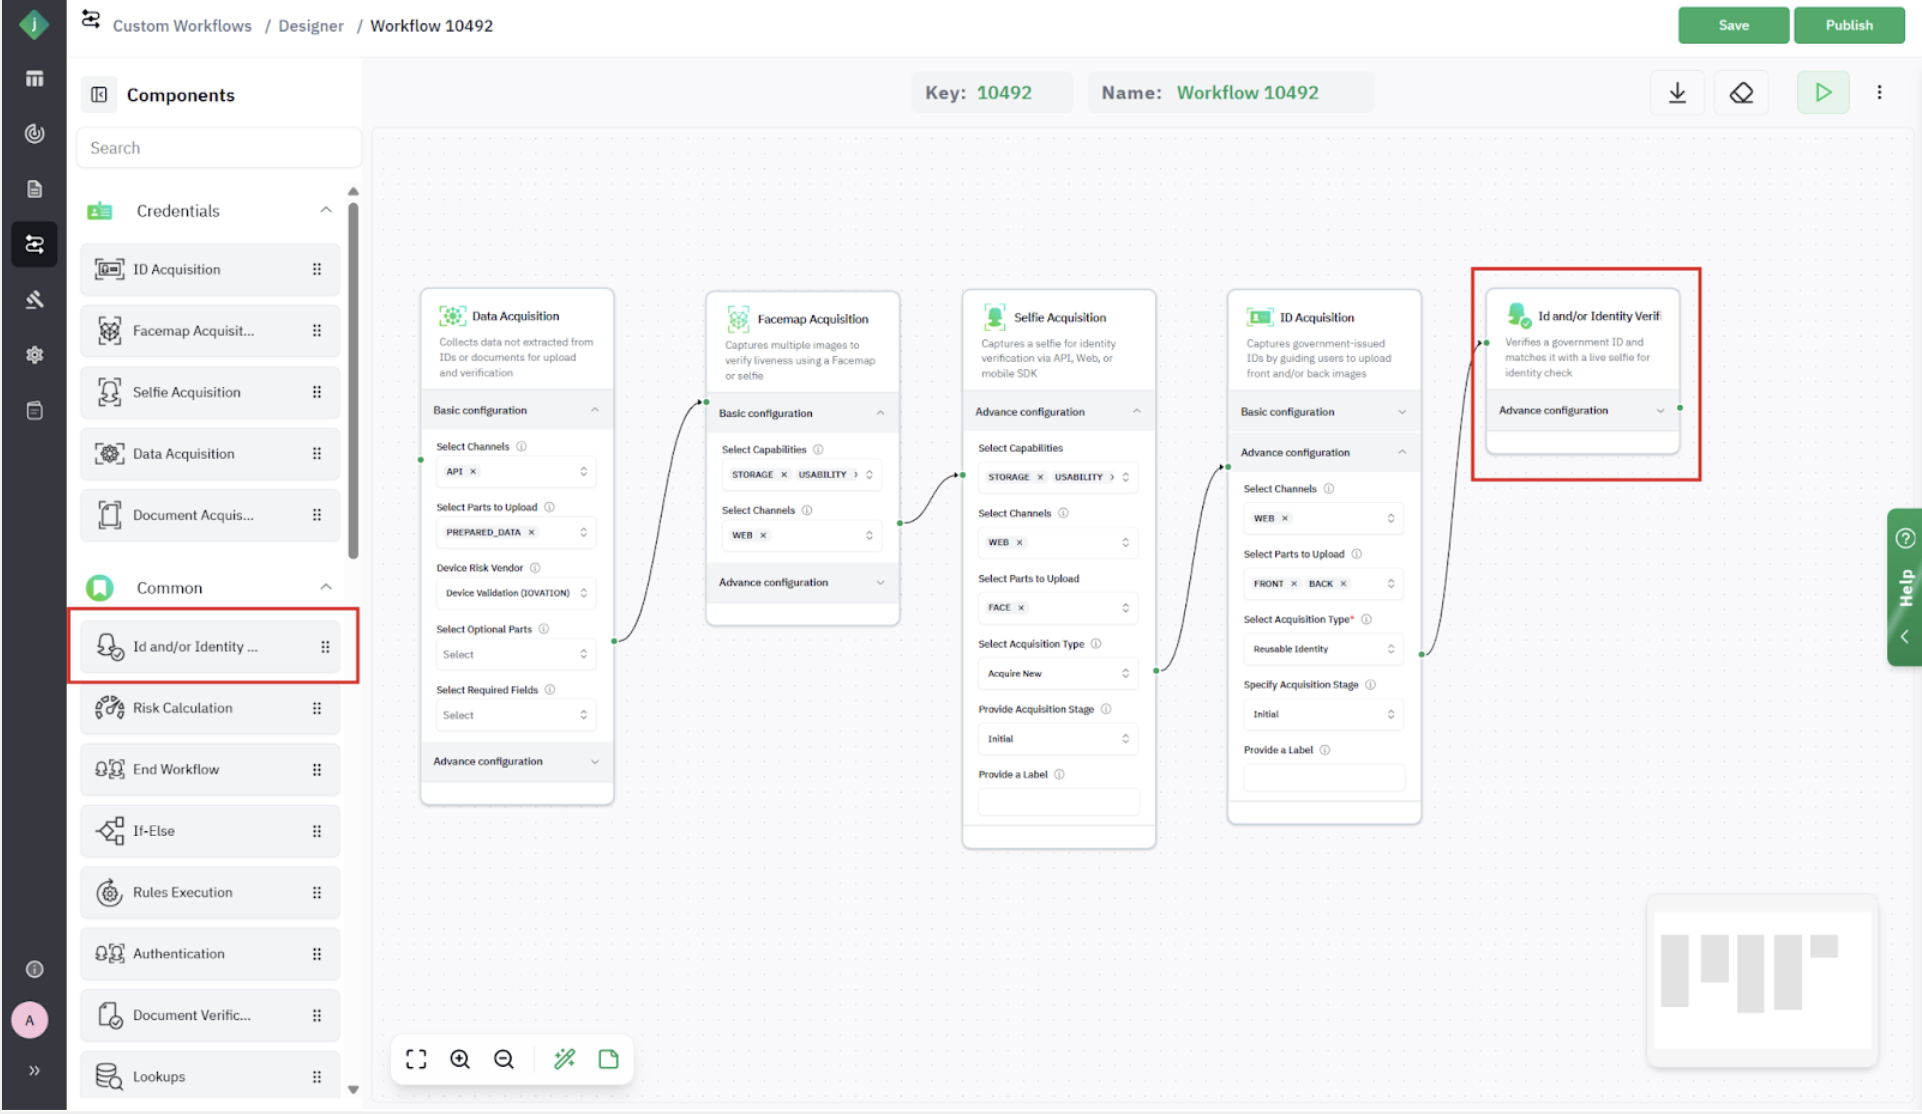
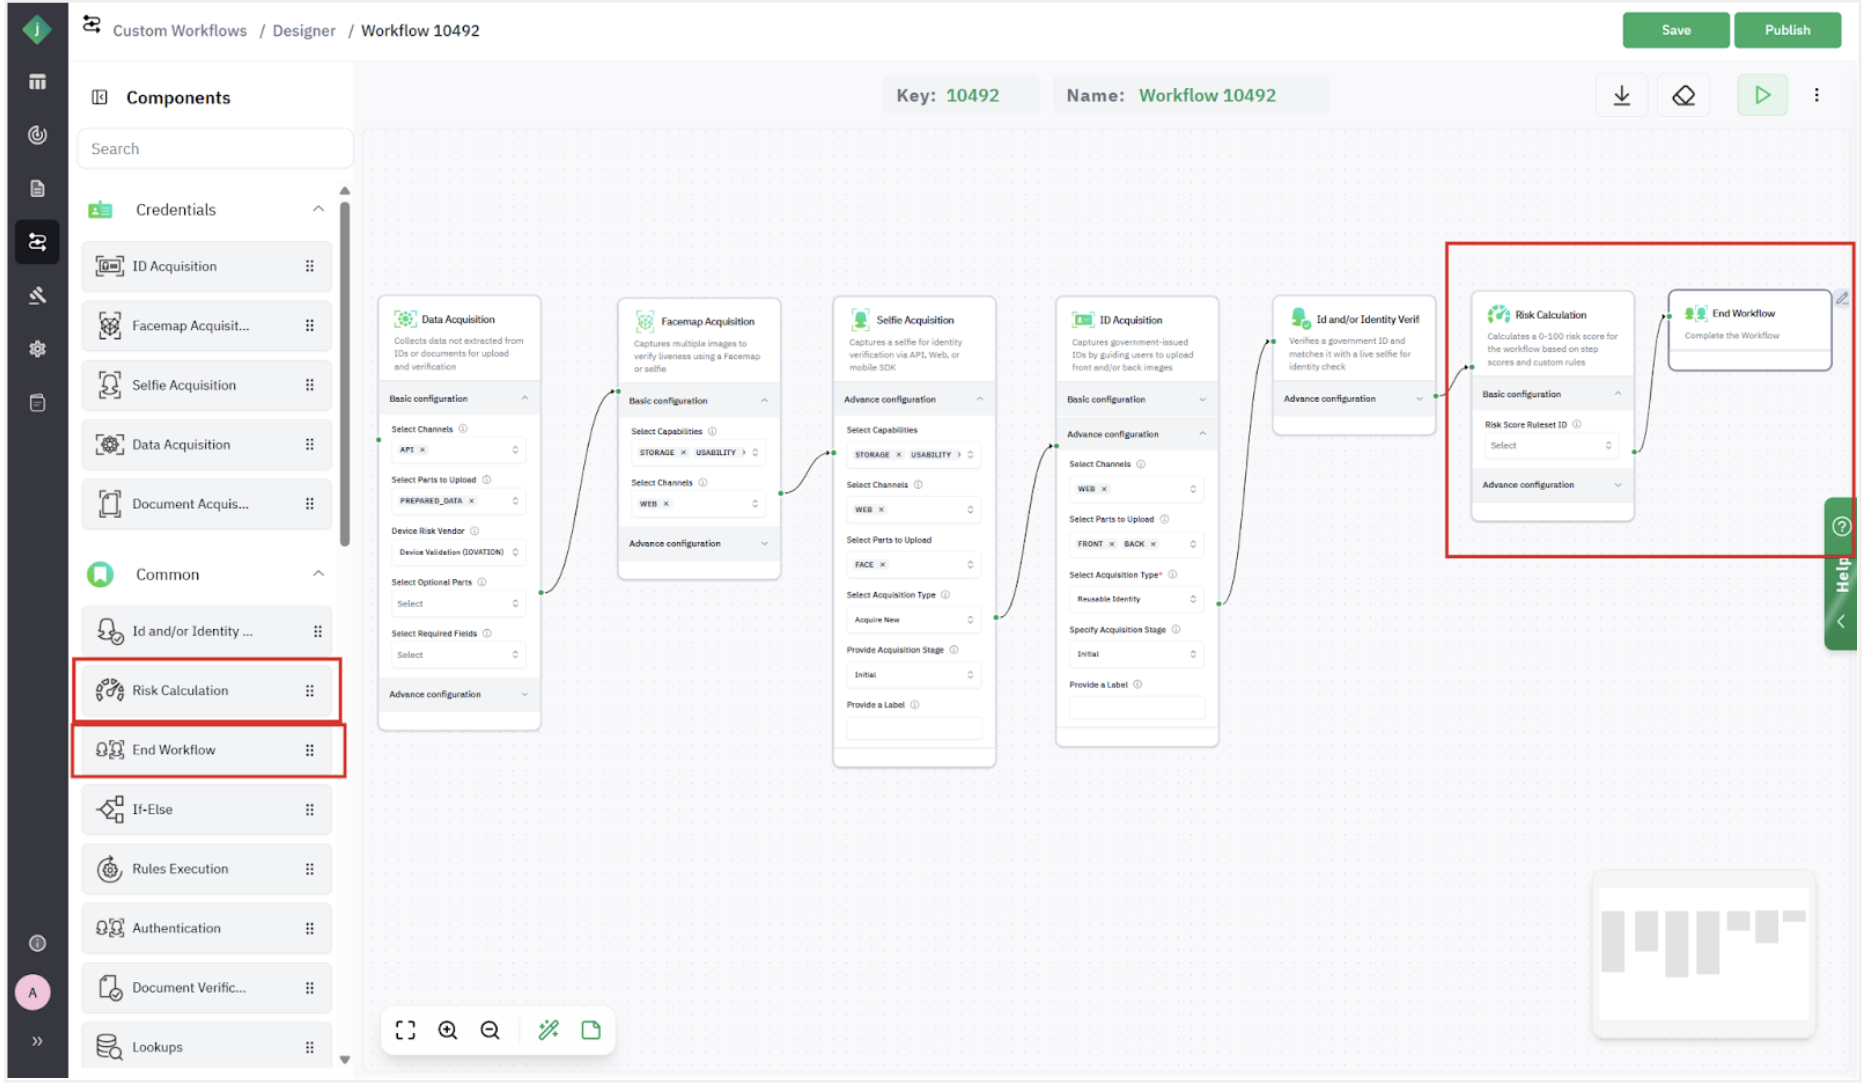
- From the Common section, add a Risk Calculation step and the End of Workflow step.
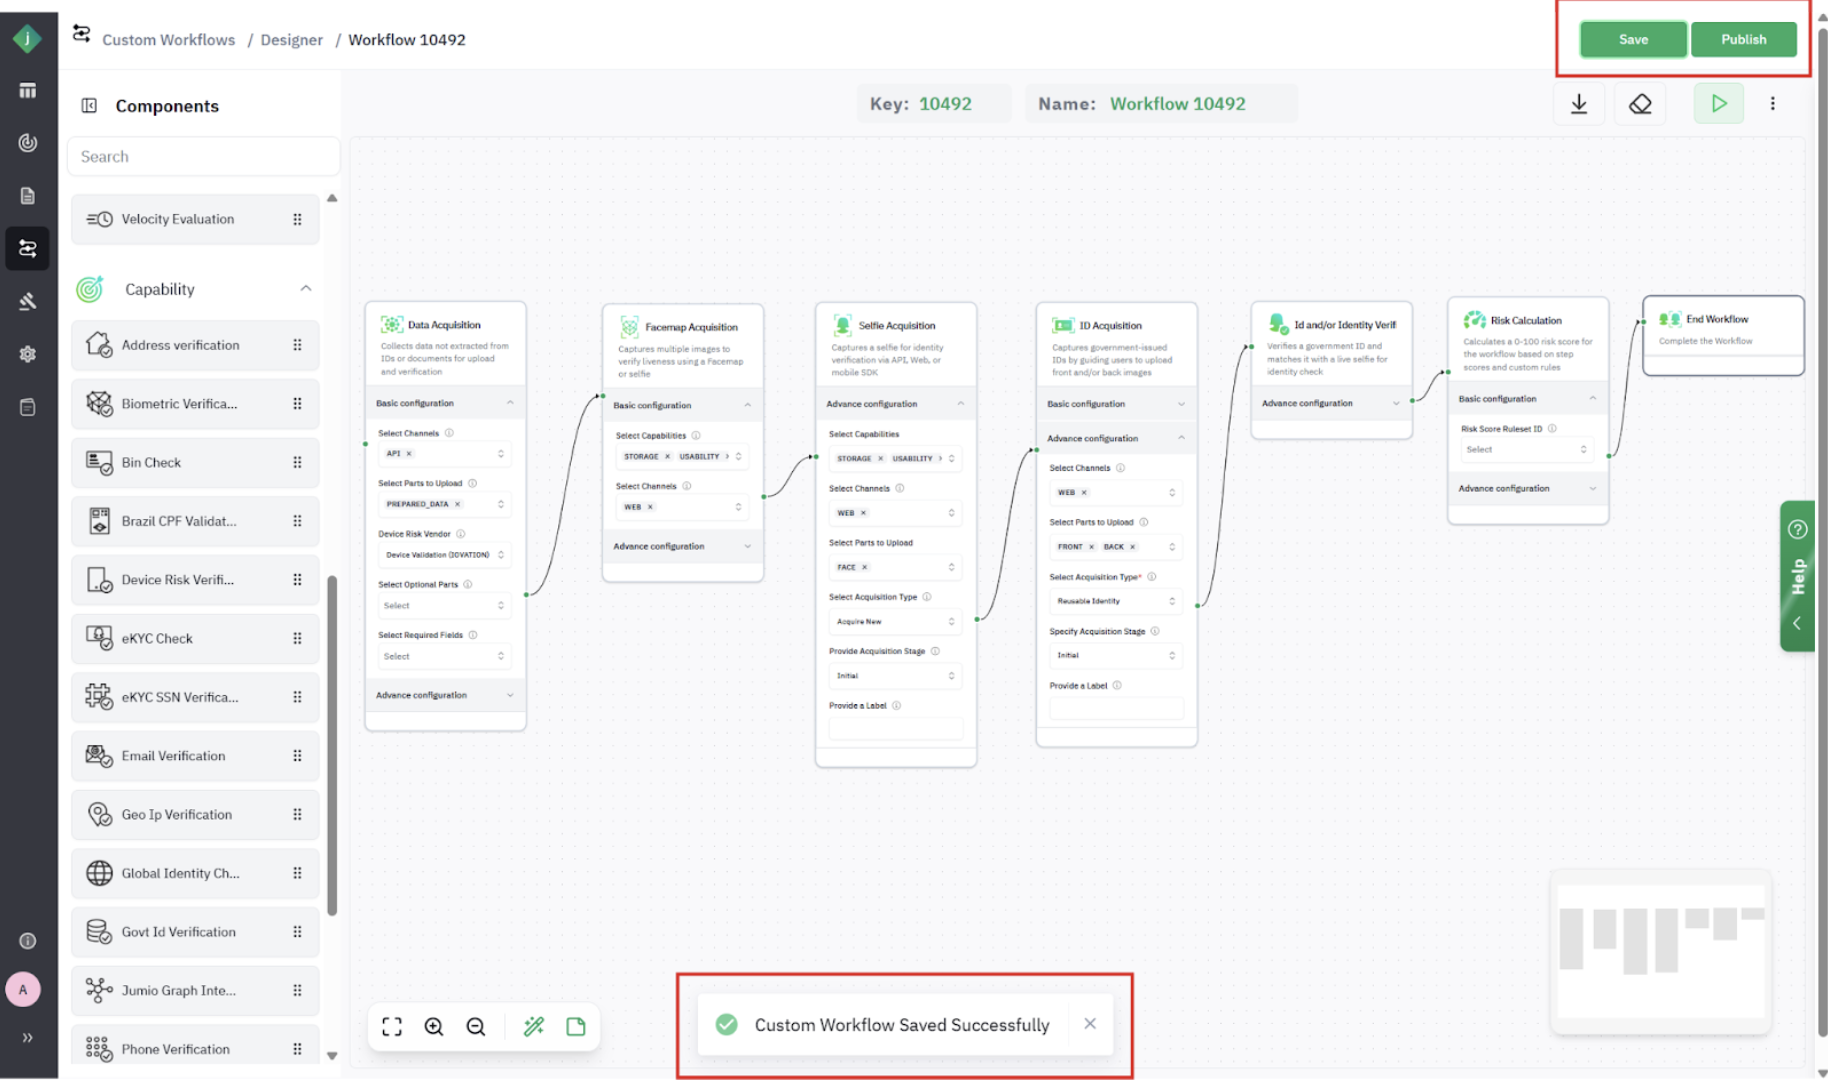
Step 4: Save and Publish your workflow.
- You will notice that the Custom Workflow Saved Successfully.
Include additional elements, such as Lookups or other risk signals, as required.